Replaces
This part doesn’t fit a . Select from parts that fit.
Frequently bought together
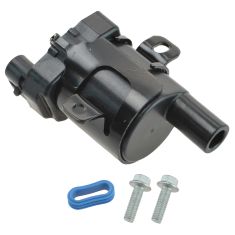
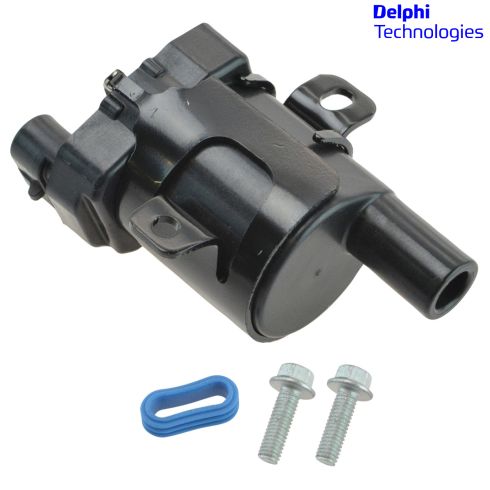
Part Details
Why Delphi?
As an Original Equipment Supplier, Delphi Automotive products from 1A Auto come directly from the source. You wont have to worry about going to the dealership for Original Equipment - these parts are the exact same as the original. Delphi products come with the same quality from the dealership at a lower cost to you.
Item Condition:
New
Lifetime Warranty
This item is backed by our limited lifetime warranty. In the event this item should fail due to manufacturing defects during intended use, we will replace the part free of charge. This warranty covers the cost of the part only.
Returns: Parts with electrical components cannot be returned once installed.
FREE Shipping is standard on Orders shipped to the lower 48 States (Contiguous United States). Standard shipping charges apply to Hawaii, Alaska and US Territories. Shipping is not available to Canada.
Expedited is available on checkout to the United States, excluding Alaska, Hawaii and US Territories as well as P.O. Boxes and APO/FPO/DPO addresses. Final shipping costs are available at checkout.


Created on:
Tools used
Brought to you by 1AAuto.com. Your source for quality replacement parts and the best service on the internet. In this video we're going to replace an ignition coil on this 2002 GMC Sierra with a 6 liter Vortec V8. This procedure is the same for most of the 4.8, 5.3, and 6.0 liter Vortecs in the trucks as well as the SUV's, very simple, only tool you'll need is a 7 mm socket with a ratchet and extension.
The coils on this GM V8's is pretty easy to get to. There's four of them each side, eight total, one for each cylinder. They're right up here on top. I'm going to do this one because it's just the easiest one to see and film. They're all really easy to get to though. Now, there's a harness that goes in right here. I'm going to pull back on that tab and pull up and the front wire is right down here. You twist it. Hold down. Now you can see the two 7 mm bolts on each side holding it in. One here and one there. We'll just speed it up as we're removing those two 7 mm bolts with a socket and a ratchet and an extension. Our original coil, the new one from 1A Auto, you can see it's all the same. It's going to bolt in just like the original. I'm going to speed up again as I just tight those bolts in and then tighten them up with my socket, ratchet and extension. When you tighten them you want them nice and firm. They're not to be overly tight though. Put the extension back in and then plug your plug wire right back and then just repeat for the other seven.
We hope this helps you all. Brought to you by www.1AAuto.com. Your source for quality replacement parts and the best service on the internet. Please feel free to call us toll free 888-844-3393. We're the company that serve you on the internet and in person.
Tools used
Brought to you by 1AAuto.com, your source for quality replacement parts and the best service on the Internet.
Hi, I'm Mike from 1A Auto. I hope this how-to video helps you out, and next time you need parts for your vehicle, think of 1AAuto.com. Thanks.
In this video, we're going to show you how to replace an ignition coil on this 2003 GMC Envoy XL, with the 5.3 liter V8 engine. The items that you'll need for this is a new ignition coil from 1AAuto.com, 7mm socket and ratchet, and a flat blade screwdriver.
Because this is a V8, there's four ignition coils on either side of the engine, four here, and four more here. Each one is held in with two 7mm bolts. Start off by disconnecting the harness. Just lift up on the tab and disconnect it, and then pull and pry off the spark plug wire from the ignition coil, and then remove those two 7mm bolts. Once the bolt's removed, the ignition coil will pull right off.
On the left, is the old ignition coil; on the right, is the new one from 1A Auto. You can see they're identical, and will fit exactly the same. Wipe down the area where the ignition coil goes. Reconnect the harness to your ignition coil to help hold it into place, and then line it up on the bolt holes, and replace those two 7mm bolts, and tighten them up. Reconnect the plug wire, and repeat for any of the other coils you want to replace.
We hope this video helps you out. Brought to you by www.1AAuto.com, your source for quality replacement parts and the best service on the Internet. Please feel free to call us toll-free, 888-844-3393. We're the company that's here for you on the Internet and in person.
Tools used
You can move these heater hoses out of the way. Just pull them out of the bracket and slide them to the side. Then you can access the coils.
You can take this wire off right here. Just twist it back and forth. You should be able to do it with your hand, and just slide it off like that. Disconnect the connector. There's a little tab. Just pull up on the tab, slide it out. Now just take a ten millimeter socket, take this bolt out here and the one right there. Get those bolts out. Grab the coil, just slide it up.
Take the new coil. Set it in position. Put the bolts in. Get those started. Right there and right there. Then I can torque these bolts to 71 inch-pounds. Plug in the coil. Lock it in place. Take the coil wire and slide it on. Then we're gonna do the same procedure for the rest of them.
And move these heater hoses, put them back in the bracket.
Tools used
Tools used
Brought to you by 1AAuto.com, your source for quality replacement parts and the best service on the Internet.
Hi, I'm Mike from 1A Auto. I hope this how-to video helps you out, and next time you need parts for your vehicle, think of 1AAuto.com. Thanks.
In this video, we're going to show you how to replace an ignition coil on this 2003 GMC Envoy XL, with the 5.3 liter V8 engine. The items that you'll need for this is a new ignition coil from 1AAuto.com, 7mm socket and ratchet, and a flat blade screwdriver.
Because this is a V8, there's four ignition coils on either side of the engine, four here, and four more here. Each one is held in with two 7mm bolts. Start off by disconnecting the harness. Just lift up on the tab and disconnect it, and then pull and pry off the spark plug wire from the ignition coil, and then remove those two 7mm bolts. Once the bolt's removed, the ignition coil will pull right off.
On the left, is the old ignition coil; on the right, is the new one from 1A Auto. You can see they're identical, and will fit exactly the same. Wipe down the area where the ignition coil goes. Reconnect the harness to your ignition coil to help hold it into place, and then line it up on the bolt holes, and replace those two 7mm bolts, and tighten them up. Reconnect the plug wire, and repeat for any of the other coils you want to replace.
We hope this video helps you out. Brought to you by www.1AAuto.com, your source for quality replacement parts and the best service on the Internet. Please feel free to call us toll-free, 888-844-3393. We're the company that's here for you on the Internet and in person.
Tools used
Okay, friends. Before we get started on doing our ignition coil here, we just wanna make sure that you have safety is your number one concern. Always have your eye protection and your hand protection. Let's get started.
Let's come right over here on the passenger side of the engine. If we're looking for the coils, you're gonna see them right up along the top or side, right along here. All four going down the side and then, of course, on the other side of the engine you'll have the same four. Now, we're gonna show you on this front one right here, because it's the hardest one. And it's not very hard at all, but it is the hardest. We need to grab these heater core hoses, move them out of the way. Once they're out of the way we need to remove this bracket. Use your 10-millimeter and take off this nut.
The next thing we're gonna do is take a nice small pocket screwdriver, you can use pretty much anything, including your finger, but if you take the small pocket screwdriver, you can go right along here, lift up on this tab, and then you should be able to draw your electrical pigtail away.
Now let's move on down from the coil to the spark plug wire. Grab onto it. Give it a nice twist and pull it right off. Looking at the coil on either side, you're going to see a 7-millimeter bolt, remove both. Hold onto that coil, there's nothing holding it on there, except for this bolt at this point. There it is, friends.
Now it's gonna be time to install our brand new coil. Just gonna take it and bring it right down here, and I'm gonna line it up with exactly where I removed it from. Start in both of my bolts before I tighten either of them down. Go, both are straightened. Let's go ahead and snug them up. I always like to use a regular ratchet to make sure they're snug. Go ahead and connect in your electrical connector. Let's grab that spark plug wire. Go ahead and use a little bit of dielectric grease in there, that's gonna be helpful, and then connect it right onto your coil. Listen for a little click noise, give it a nice twist and a nice little tug, to make sure it's secured on there. You also wanna make sure that your spark plug wire is in no way touching that exhaust manifold.
So, now the replacement process for all the rest of the coils would be the same at this point. But moving along to finish up with this coil, we need to make sure we get this bracket back on. I'm gonna take the bracket, put it on there just like this. Snug it right up. There we are. Make sure it's nice and tight. Make sure you secure your heater core hoses. Double-check everything. This looks great.