Replaces
This part doesn’t fit a . Select from parts that fit.
Frequently bought together
Part Details
Install Tip: When replacing steering components, have a professional alignment performed afterwards. This ensures proper tracking and even tire wear.
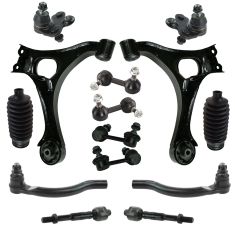
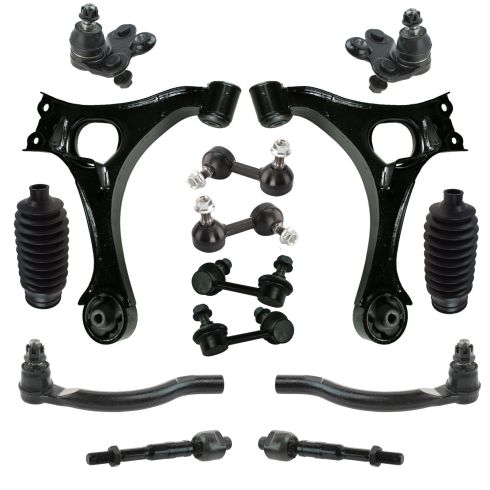
Complete Repair in One Purchase - Stop searching for parts individually and complete your repair with a customized kit or set from DIY Solutions.
High-Quality Parts from Trusted Brands - DIY Solutions' kits and sets are selected from the best automotive brands and include hard-to-find and even obsolete parts you may need for your vehicle.
Guaranteed Fit - DIY Solutions ensures its selected parts are quality-tested to guarantee fit and function.
Item Condition:
New
Attention California Customers:
 WARNING: This product can expose you to chemicals including Chromium (Hexavalent Compounds), which is known to the State of California to cause cancer, and birth defects or other reproductive harm. For more information, go to www.P65Warnings.ca.gov
Lifetime Warranty
This item is backed by our limited lifetime warranty. In the event that this item should fail due to manufacturing defects during intended use, we will replace the part free of charge. This warranty covers the cost of the part only.
FREE Shipping is standard on orders shipped to the lower 48 States (Contiguous United States). Standard shipping charges apply to Hawaii and Alaska.
Shipping is not available to a P.O. Box, APO/FPO/DPO addresses, US Territories, or Canada for this item.
Expedited is available on checkout to the United States, excluding Alaska, Hawaii.
Final shipping costs are available at checkout.


Created on:
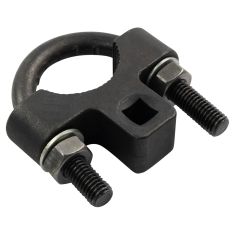
Tools used
Hi, I’m Mike from 1A Auto. We’ve been selling auto parts for over 30 years!
Turn the knuckle out a little bit this way until we see the ball joint. Remove the cotter pin using some needle nose pliers. Pop the little part up and over—that should come right out. Let's spray some rust penetrant on it to help it move. Take your 19mm box wrench.
This is really hard to move, so I'm going to use the dead blow mallet and hit the wrench. Try to break it free. This is on here pretty tight. I tried hitting it with the dead blow, but it didn't work, so we're going to use a cheater bar here. You could just use a piece of pipe. Going to put it over the wrench and give you extra leverage. Sometimes you loosen it too far and then you can't get your box wrench out, so I'm just going to tighten it back up a little bit. And once I can get my box wrench out, now we take the open-ended part and continue to loosen in. That will have to come off, with it loosened, so what we're going to do is thread it back down but not all the way. Then I'll start loosening these bolts under here.
I'll just spray some rust penetrant on the bolt that's right here, that's holding the ball joint in and on the two nuts. I have a 17mm socket and extension and a long breaker bar to get these free. That one's loose. Get this one loose. I've got those loose. I'm going to switch to a ratchet. Now, I'm just taking them out.
I'm going to use a ball joint separator and slide it in here. Get it in place. Use the appropriate sized socket for yours—this one is a 15/16ths. Going to tighten it and it will pop the ball joint down. Break free with a snap. Remove this nut the rest of the way. Now I can get the nut off that it's slid down. This ball joint is loose. It's also loose here in the arm. Going to use some pry bars to just pry down on the arm and pop the ball joint out of the lower control arm. And just, the whole strut is holding the brake, knuckle, and axle assembly. I just reach up here and just pop this down, and that should slide right out of there.
This is our original ball joint that came out of the vehicle. Here’s a brand new one from 1AAuto.com. See the same style ball joint. A new one comes with a new castle nut, and also comes with some new nuts for underneath and a new bolt and a new cotter pin. They're the same style ball joint. This one is marked L for left. This should fit great and work great in your vehicle.
I'm just going to wipe some dirt off the top of the control arm right here. A little bit of the grease off the bottom of the knuckle. Don't have to go crazy, just some of the big chunks, get them out of there. Take the ball joint and get it up in here. Now, I'll take the castle nut and just sort of capture it, just so the ball joint doesn't fall out. Now, I can pull down, and push this out a little bit. I just kind of maneuvered it up into here. I'm just going to give it a little push, get it into place, use the pry bar to kind of readjust it, and just push it home with my hand. I'll get these two nuts caught so it doesn't pop back out. There's a new washer that came with this one.
Reinstall that with the bolt. Thread them in by hand, but don't cross-thread. Now I'm just going to snug these down and come back and torque them afterwards, but in the meantime, get them nice and even.
I want to torque these, starting with this nut here, then the rear nut, then the bolt. Torquing these to 43 foot-pounds. I'll turn this back out so I can see the nut and already getting tight. The placement nut is at 21mm. Use the open-ended part of the wrench to tighten. There is a torque for these, it's very difficult to get a torque wrench in here so I'm just going to tighten it nice and tight because it will have the cotter pin to hold it.
Almost there where the opening is free for the cotter pin. So, right there, I can go straight through with the cotter pin now. Right through here. Grab the cotter pin with my fingers and bend it up now. Sometimes you might need to use pliers. This one's long enough I can do it with my fingers. These go down that way, go down that way. Cotter pin is installed. The ball joint is replaced.
Thanks for watching. Visit us at 1AAuto.com for quality auto parts, fast and free shipping, and the best customer service in the industry.
Tools used
Tools used
Tools used
Tools used
Tools used
Tools used
Hi, I’m Mike from 1A Auto. We’ve been selling auto parts for over 30 years!
We've got our wheel off here so you can kind of see what we're doing a little better. Whatever is easier for you doing this on the ground in your driveway if you need to, jack it up, and take the wheel off. But the sway bar links are towards the inside of the car here, so we've got it up in the air. You don't really need to be over in this area, but whatever's easier. That's why we've got the wheel off. It just lets more light in here so you can see what we're doing.
I'm going to take some rust penetrant and spray it in on the sway bar link here, both ends of it. Use a rag just to keep it from dripping all over the floor. A little more in here. These are 14 millimeter. And then on the end of these, to counter hold them, the 5 millimeter Allen key. They're usually pretty rusty, you have to work it in there. Get in there nice. Make sure it's seated all the way. Now, I'm going to attempt to break this free. Once that's broken free, I can use this to counter hold it, and I'll just take it off. There's a lot of rusty bits coming out of here, so I'm just going to keep spraying rust penetrant on here. Actually, I was tightening it to clear the threads. Now I'm going to loosen it again. I'm just going to keep doing that over and over again until I get it to come off. Worst case, if you're doing this and this Allen key part strips, you're going to have to come over here with some vice grips and grip down or hold it as tight as you can, and remove this.
Then of course, if you're trying to reuse the sway bar link, you're probably going to damage it if this gets stripped. You'll have to have it replaced with a new one. But we're taking this off to put a new one on anyways. I switched to a ratcheting wrench just to make this a little easier. I'm going in and out because the threads get gummed up with the rusty junk. If these threads are really rusty, you can take a wire brush and try to knock some of the stuff off. Might make it a little easier for these to turn, and eventually, it should come off. Once you get it past the locking bit of the nut, it'll start to get a lot easier. That's one end. But instead of taking it out, I'm going to leave it in there and just throw the nut on real loosely. Whoop. If I can get over the threads, just throw it on real loosely. Just so that when I'm working on this one, it's not flopping around everywhere. Take a brush and knock off any big pieces of rust.
Additionally, that would be a sign of a loose sway bar link is that sort of rattling. I'm going to use a deep socket and longer ratchet. I'm going to try to just break this free before I start turning on it. All right, so now I can see it's just turning in the little ball joint, but it is broken free from here. Put on some more rust penetrant, and put a ratcheting wrench on here. And the five millimeter Allen to car hold. And this will be the same as the other one, just got to keep working at it. All right. And sometimes you almost get it off just the way it's supposed to go with the Allen key and it strips right here at the end. Not quite there. So now I have to get some locking pliers on here and finished taking it off the rest of the way.
Since I don't need the opening in the wrench, I'm going to switch to a ratchet with a 14 millimeter socket and finish this off. Snap the pliers off of here, get this nut off. There's our sway bar link.
Here's the original sway bar link. Brand new one from 1aauto.com. It's the same style, these line up nicely, comes with new nuts. These are locking nuts. See how they're oblong. And also you can put in the hex key in here. Those should fit great and work great for us.
Take the nuts off of these. They're only going to line up one way. Get the nuts started. Probably be able to spin them down until they get to the oblong part that locks. These are actually 15's. I'm using a ratcheting wrench and just watching to see if they're tightening down without spinning in the ball joint part, which it looks like it is. So, now it's starting to spin. So that's as tight as I can go with that one for now.
Let's start with one now. Same way. I actually have this one seated down and it feels tight. And this one needs to be tightened some more. So what I will do is put a wrench on here, a hex key in here and just snug this down. Get it nice and tight. Do the same for this one. That's already nice and tight. Get this off. That sway bar link is replaced.
Thanks for watching. Visit us at 1AAuto.com for quality auto parts, fast and free shipping, and the best customer service in the industry.
Tools used
Tools used