Replaces
This part doesn’t fit a . Select from parts that fit.
Frequently bought together
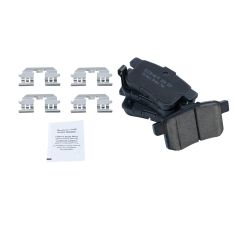
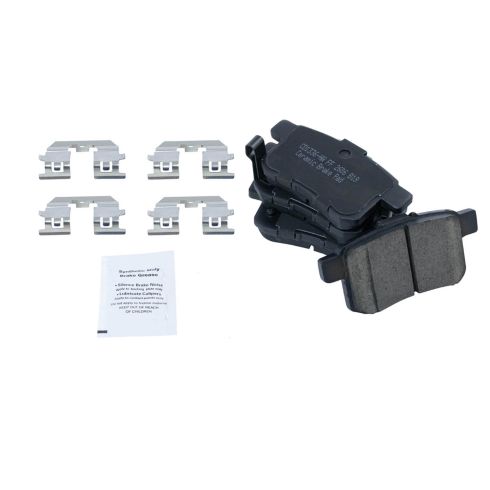
Part Details
Product Features
TRQ brake pads are manufactured using premium raw materials and design standards to restore original performance. TRQ brake pads are positive molded and utilize a multi-layer shim for enhanced performance and service life. TRQ’s combination of materials and design ensures a low dust and low noise braking experience. TRQ recommends replacing your brake rotors when you replace your brake pads to ensure even wear of components and improved braking comfort. All products are fit and road-tested in our Massachusetts R&D facility to ensure we deliver on our promise of Trusted Reliable Quality.
Item Condition:
New
Attention California Customers:
 WARNING: This product can expose you to chemicals including Lead and Lead Compounds, which are known to the State of California to cause cancer, and birth defects or other reproductive harm. For more information, go to www.P65Warnings.ca.gov.
Lifetime Warranty
This item is backed by our limited lifetime warranty. In the event that this item should fail due to manufacturing defects during intended use, we will replace the part free of charge. This warranty covers the cost of the part only.
FREE Shipping is standard on Orders shipped to the lower 48 States (Contiguous United States). Standard shipping charges apply to Hawaii, Alaska and US Territories. Shipping is not available to Canada.
Expedited is available on checkout to the United States, excluding Alaska, Hawaii and US Territories as well as P.O. Boxes and APO/FPO/DPO addresses. Final shipping costs are available at checkout.


Created on:
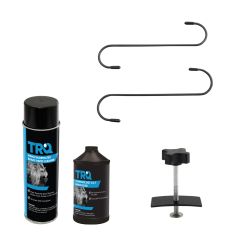
Tools used
Hi, I’m Mike from 1A Auto. We’ve been selling auto parts for over 30 years!
Use a long breaker bar and 19 millimeter socket to loosen the lug nuts with the vehicle on the ground. Hubcap can stay on. Going to raise and support the vehicle. We're using a two-post lift, but you can use a jack and jack stands. Lug nuts are loose. I'll just use the sockets. Going to shake them off.
I'll remove the tire and wheel, and put it aside. Hold onto the wheel so it doesn't fall off. Get the wheel and tire off. Wheel's stuck. Just kind of knock it a bit and take it right off. Take a 12 millimeter box wrench. Remove the lower and upper caliper slide pin bolts. I'll start with the lower one here. Break this free. If they spin on you, there is a spot here where you can put a ... check the size. Can counterhold it with a 17 millimeter open ended wrench and break it free. Usually you don't have to do that. Usually that's just for tightening them up, but if you need to, that's what that's for on both top and bottom.
Before I take this bolt out, I'll loosen the top one. Take them out by hand. Work this caliper off from here. You can't pry the caliper back in to compress it because the parking brake assembly is part of the piston, it actually spins out to set the parking brake tension so you can't simply push it in. If it's stuck you're going to just pry it out or wiggle it out like this. We'll take this off.
This piston is really far out. These pads are very, very worn. They're basically worn out. You can see they're worn unevenly too. This tells me this caliper is seized. Either the slide pins are seized or the piston is seized. It's actually at the wear indicator. This metal tab will start to contact the rotor and make noise and it's basically right there.
See that these slide pins move. They move but they have a lot of resistance. These boots are torn, actually just pull this right out. It's not very rusty but there's some grease, I don't like how the boot's torn. Put that one back in, check this one. That one's sliding. It’s not very rusty. The boot is torn. I'm going to suspect that this piston is stuck.
Normally you could take some needle nose pliers, or there is a tool for this that fits in these little grooves and you'd spin this in to get it to retract. It's really hard to turn. It should be a lot easier. Actually it doesn't even want to turn anymore. This caliper is seized up. Going to replace this caliper. Normally you turn this. It would retract all the way in to the caliper.
You could reinstall with your new pads, your new rotor. Put it back on. Torque everything up and you'd never need to change this caliper because it'd be working perfectly. But since this one is not working well, we're going to replace it. What I'm going to do before I remove the caliper bracket, since I want to change this caliper, I want to remove the brake line and then the parking brake cable which is also bolted in there.
And since I don't want to struggle with this trying to hold it, I'm going to just put it back in the bracket. I didn't put the pads back in—I'm just going to loosely install the caliper slide pin bolts. You can see they're spinning there. Get this one in place. Now the caliper's held in place. I can work on removing this banjo bolt without it flopping around on me. Going to use these plastic line pliers to pinch off the soft brake hose. Just squeeze it there. It'll prevent some of the brake fluid from escaping.
Still probably going to spill some. It doesn't have to squish down that much, the inside of these is not very big. That should be enough. I'm going to break this free. There'll be brake fluid in the caliper that's going to spill out. Whatever's in this hose so you're going to want to have a way to catch it and clean it up. This is a 14 millimeter banjo bolt.
Use the closed end of the wrench to break it free. So I'll leave it just like that for now. Just sort of hand tight so it doesn't leak too much. I'll work on breaking the bolt free that's holding the parking brake cable on. Spray some rust penetrant down on there. Let's get these loose. This is a 12 millimeter bolt. Using a 12 millimeter wrench on it. Put it on here. Break this free. Switch to 12 millimeter ratcheting wrench. Make this quicker. Pull it off. Pull the cable out of the bracket.
I can work the cable off the end with the lever here. Oops. Got the bolts. Work the cable off just like that. I'll just put it aside. Reattach it afterwards. Now I can remove these caliper slide bolts that were holding it in. Brake fluid dripping on that one. That's loose. I'm going to finish taking this off. There should be a crush gasket on this side and a crush gasket on this side. Just make sure that that comes off. There's the banjo bolts. So the crush gasket actually fell into my bucket.
That was the one that was on the bottom, and there's one that's stuck to the bolt still. I just want make sure that both have come off these lines so that when you replace the caliper you don't double gasket it. The caliper will come out, and I'm just going to dump the extra fluid out of there. And we'll keep this bucket here for the dripping fluid. Just draining the fluid out so it doesn't make a huge mess.
Now I can remove this bracket, so I'm just going to put this over here and keep it out of the way. Get these two bracket bolts off. This would be the same if you weren't replacing the caliper. Use the 17 millimeter socket and a short extension and a longer ratchet. There is a little ball joint here you have to kind of work around it. Get this bolt loose. Actually I'll start with the bottom one with the shorter extension. Break it free.
Take this top one. Use the little bit longer extension. This ball joint kind of gets in the way so using the extension for clearance with a 17 millimeter socket. Break it free. I've left the lower bolt still in place. This way it doesn't move on me while I was trying to break it free. Just switch to a shorter ratchet, and I'll just finish loosening these up until I can take them out with my fingers. They're loose. I can take them out with my fingers. Get the bottom one, I'll hold onto the bracket so it doesn't fall. Take that out.
To remove the rotor from the hub, need to unscrew these two Philips head screws. Use a large Philips head screwdriver. Sometimes these can get stuck. We may need to hold the rotor or you might even need an impact screwdriver to remove them. Try this out. So a little bit of force. They shouldn't be in there with a lot of torque but they can rust. This one's not too bad. Take out this one same way. All these do is hold the rotor in place while you're assembling stuff and keep it from moving around so if they come out and they're destroyed you don't need to put them back in. But they can be handy.
If this rotor is stuck to the hub you could put two 8 millimeter by 1.25 bolts in here and push it off. This one's pretty loose, it's going to come right off. The parking brake assembly is done through the caliper. It's not done inside the rotor so there's nothing in here other than the wheel bearing. This looks to be in really good shape, if this was really, really rusty you could take a wire brush and clean this off. But it's just fine so we're going to leave it as is.
This is our original rotors and pads from our vehicle. Brand new ones from 1AAuto.com. You can see they're exact same bolt pattern, same style rotor. Pads the exact same style. These are very worn out. Actually this one is actually almost down to the backing on the top. It's very unevenly worn. That's what new pads should look like. Nice and thick. Same exact shape. This stuff will work great and fit great in your vehicle.
Can install hardware on the new caliper if you're replacing it. These will just push down into place. The same for both sides. Going to install the rotor backwards. I can clean the packaging oil off the back with some brake parts cleaner. You don't want to get this oil on the pads. It just when they're shipped it keeps the rotors from flash rusting. You want to clean that off with brake parts cleaner. Now I'll just wipe down the excess.
Flip it over and you install it. Just make sure you line up the screw holes, threaded openings in the hub. Push it right in place. I will install the screws. This'll keep the rotor from moving around on me. You don't need to go crazy with these, just snug them up. The wheel and the lug nuts will hold the rotor in place. These just keep it from flopping around while you're installing the brake parts.
I'm going to clean the oil off of the front of the rotor. The rotor's nice and clean. Install the caliper bracket. Be exactly the same if you're reusing it. Get it in place. You might have to move it around a little bit. Find the openings. Get one started. All right I'm going to get the other one started. Thread them in by hand. Tighten them down. I'm going to torque these caliper bracket mounting bolts to 79.6 foot-pounds. I rounded it up to 80 foot-pounds because it close enough and it's easier to spot on the torque wrench. Oops, I should go in the correct direction.
Bottom one, do the top one. It's not ideal to have an extension but it's difficult to get in here because of clearance. When it clicks, you're all set. I'm going to hook up our parking brake to our new caliper. Push it through the hook. And then it's going to wind up in the bracket here. I'll rotate it up. Get the bolt caught in there that holds it. Let's see here.
Use a 12 millimeter ratcheting wrench to tighten it. Once it gets tight, I'll stop—that's perfect. All it's doing is holding the cable in place. I'm going to hang the caliper here for now. I'll give the brake calipers a quick spray with brake clean to get any dirt and grease out of there. You don't want to touch this part of the material, and get it all dirty and greasy before up put it on. Touch the rotor. It'll reduce the braking performance. Quick spray, you don't have to soak them. It'll dry right off.
Put a little bit of brake caliper grease on the ears so that they will slide on the clips. Slide this one into the wear indicator in the back. This outer curve matches the outer curve of the rotor. Should just push into the clips. Top and bottom, it'll sit right there. Make sure it seats against the rotor. Might have to give it some force to push it in. Do the same exact thing for the outer pad. Put it into the clips.
At this point if your caliper was original and you're still using it, your brake line would be hooked to it. You would spin this piston into the caliper so it looked like this. You'd turn it, set of needle nose pliers, and you'd retract it. That way it would fit over these brake pads. You wouldn't have to loosen the bleeder. You wouldn't have to remove the line. Your brake fluid would go back into the master cylinder, and then you would push in the pedal afterwards inside the car to bring the piston out.
But since we replaced this. I'm going to mount it to the brake caliper bracket first, and then I'll attach the brake line. Put this in place. There is a pin on the back of the head that's going to line up with the center channel of this. Just slide it into place. Install the new slide bolts. They line up they should go right in by hand. See how the caliper slides in and out?
You press on the brakes the piston comes out and meets the pads and tightens them up. So torque these and then install the brake line. The torque on these is 9.4 foot-pounds for the caliper slide pin bolts both top and bottom. I'm going to round up to 10. I'm going to counterhold the slide pins with a 17 millimeter. These new ones are actually 14, the originals were 12, not a big deal. Tighten them up. Torque them down. It's very light torque, you can just hear it click. Don't want to over tighten them, you can break them. At this point if you were using your original caliper.
This part of the brake job would be complete. Could mount up your wheel, torque the lug nuts, put the vehicle on the ground, gently press on the brake pedal to bring the piston back out to meet them. But we need to reattach our brake line. So I pull this cap out of here. Using some needle nose pliers just pull it out. It's just a protective cap and it keeps dirt from getting in there. Not going to unclamp the line yet.
It does have an alignment pin. It's going to go in here. I need to grab a new banjo bolt. New banjo bolt has copper washers—one's going to go on the top, go through. One's going to go on the bottom. Put it in, it's going to line up with that line. That pin sits right inside the caliper. This should thread in nice and easy by hand. Just like that. This is 12 millimeters. I'm going to tighten it up just a little bit. It's going to start to seat those copper gaskets. I'm going to come back—I'm going to torque it. Use the torque wrench. I'm going to torque the banjo bolt to 26 foot-pounds. That will crush the copper gaskets and create a seal. Actually see the copper gasket starting to squish. Right there that's perfect. Wipe off any excess brake fluid so we can later check for leaks.
Remove this clamp. Squeeze it together. Luckily we are at the passenger side rear of the vehicle. That is the farthest from the brake master cylinders. This is actually where you would start if you were doing a brake flush because the line is the longest. I have reconnected the brake fluid. The brake line to the caliper, so there is fluid starting to flow in here but I haven't cracked the bleeder screw open yet. I haven't even gone inside to pump the brakes. What I'm going to do before I even do that—I'm going to hook up our bottle that we made out of some extra hose and we're going to put it right over here. Get our bottle hooked up. A long tube going to the bottom of the bottle. I've opened the bleeder screw.
I'm going to go in and pump the brake pedal a couple times. I'll close it, pump it up, and let it go again. I'm doing the one man method. If you have someone to help you they can be in the vehicle pumping it up for you then you can open the bleeder screw but you can do it by yourself. I'm going to tighten it up. Can't see fluid coming out, bubbles. Going to give it a couple pumps then I'll loosen it. Going to pump it up. Nice hard pedal. There is some fluid in the line here.
It's a little hard to tell because it's yellow. I'll open this up. If there's any bubbles you'll see them come out. There's a couple bubbles coming out. I'm going to give it a couple pumps. I don't see any bubbles coming out, it's a nice solid stream of fluid so I'm going to tighten it up. You just have to keep repeating this if you've got any air in the lines until it's all gone. But by clamping off this line we prevented a lot of fluid from being lost and air getting in the system. These aren't very big calipers so the volume of the cylinder is pretty small so it only takes a little bit of fluid to fill it. Make sure that's tight. You'll pump it up make sure I have a hard pedal.
Remove our line here. Let that drain into there. Take our bottle out of here. Place the bleeder screw cap. Throw the lug nuts on by hand. They hold on the hubcap. If you've got an alloy wheel, don't worry about it then. Thread them on the same way. Just tighten them down with a socket. Going to torque the lug nuts to 80 foot-pounds in a cross pattern.
Thanks for watching. Visit us at 1AAuto.com for quality auto parts, fast and free shipping, and the best customer service in the industry.
Tools used
Tools used
Tools used
One of the first things we need to do is get the wheel off of here. We're going to remove all five of these 19-millimeter lug nuts. Remove your wheel. The next thing we're going to do is spray down this area. This white area around here is corrosion. We also want you to make sure you spray around this screw right here because we need to remove that to get the rotor off. Now, if you look along the front side of the knuckle area, you're gonna see your emergency brake cable and a mounting bolt, remove that 12-millimeter bolt. The next thing we're going to do is move along to these 12-millimeter headed bolts that hold the caliper to the bracket. Remove them both.
Once those are off, you can wiggle this around. You might need a pry bar to get it off. Well, this is off. Take a peek at your caliper boot right here, make sure you don't see any fluid leaking out. If you do, you need yourself a caliper. The next thing we want to do is carefully take a pic, just go right along the piston and the boot, and just try to make sure you can go right around, and it's not going to bind up because what we're going to have to do after that is push this back. And to push it back, you need to actually rotate it clockwise as you push in. Nice. I like to use a tool that looks like this. It's a multitool, has all different sizes. That's the notches that I'm going to use. I need to go right in the middle of the X here, and I need to press it up against these arms back here and twist at the same time. This part is going to be fairly hard. Make sure you get this in as far as you can. And then also, make sure that if you were to look at this hole and the bottom, this line is as straight as possible with that, and this line would, of course, go from ear to ear. That looks good. The next thing we're gonna do is get this out of here. You want to make sure that you remember that it goes on the bottom side here. Let's try to get the pads out. If your pads are frozen in like this, you know, you had a braking issue. If your pads can't move in and out, more than likely you're going to be using more of your front brakes to stop the vehicle, and you're probably going to have overheat conditions in the rear. Let's get this out of here.
That was really in there. Something to pay attention to is the inward pad has this brake wear indicator. You want to make sure that that's in the same position as when you removed it. So, this inner pad has it facing. The next thing we want to do is remove the caliper bracket two knuckle bolts, which is this right here and right there using a 17-millimeter. What you might notice with this one is it might be hard to get a socket on there because of the upper ball joint. If that's the case, just use a wrench, put it on there, and give it a light bonk with a rubber mallet. Let's set the bracket aside. The next thing we need to do is remove this Phillips head screw. To get this out using a regular screwdriver just isn't going to work. You need something that looks a little bit more like this, which is an impact driver with, of course, the Phillips head screwdriver bit on there. Put it on, give it a twist to the left, and them give it a couple bonks. It should want to break free. Next, use one of your lug nuts, start it on one of your lugs, and then we're going to bonk right here with our hammer. If, of course, you're disposing off the rotor and you know you're all done with it you can hit out here. That way there, you don't have to necessarily worry about these. It looks pretty great. There it is.
The next thing we need to do is clean up this hub area, which is the mating surface where the rotor's going to ride. It needs to be smooth as possible. Let's clean this down. We've got our collection receptacle. Nice and clean. The next thing we're gonna do is clean the rotor braking surfaces. Make sure you get that backside as well. Beautiful. Next thing we're going to do is we're going to put on some copper never-seize around this area right here of the hub. The next thing we're gonna do is get the rotor on here. We want to pay attention to these little inverted holes right here. Those need to line up with the screw holes that are on the hub itself. So, pick one that you want it to line up with. Now, if I was to look, I can see that I have this hole and then the small inverted hole. For this right here, it's obviously backwards. So, I would have to turn it to try to line that up. That looks good. I can see a hole through there, hole through there. Pick when you want. I like to go with the one that already had the screw in it because odds are it's less rusted. Grab my tool. Now, when you put this in, you don't need to bonk it a whole bunch of times, just a couple. Give it a twist to the right, and that's it. That locks it in, and next time you can remove it fairly easily. So, we made our way over to the bench so we can finish working on this caliper bracket. What we need to do now is strip it down. What I mean by that is go ahead and take a pocket screwdriver and get rid of these tins.
Okay. Those come off fairly easily. Now, you have your caliper sliders and you have the boot that attaches to them. You just need to go around that edge with your screwdriver and break it free. Once it's broken free, you can pull out that slider easy-peasy. I'm going to set this on the side that I got it from so I can remember because it has this little rubber bushing. That's very important that you don't mix it up. At this point, if you wanted to, you can continue by taking out the boots. Just give it a little squeeze. Should roll right out of there. Same thing with this one. The next thing we're gonna do is clean up these slider pins and take a good hard look at them. You want to make sure up along this area right here is as clean as possible. If you have any buildup or rust or rot, you need to make sure it's clean because you have to have a nice seat for where that boot's gonna ride on. If you don't, water will get in. Make sure that this boot isn't swollen and it's not torn. It looks good. Do the same to both. The next thing we're going to do is clean out these boots right here. First, of course, you'd take it, give it a little squeeze, roll it around. Make sure it's not torn or broken in any way. That looks great. I'm just gonna take this rag, twist it, put it right through, just like that. Now, I'm gonna open up that slider boot and just roll it around on the rag. That gets out all the crud and it looks pretty darn good afterward. Do the same to both. The next thing we're gonna do is clean out these ports for the sliders. You want your collection bucket. We're going to be using a chemical here. So, you have to have eye protection and hand protection. Put some of that part cleaner in there, get a little bore brush. Dump it out. It looks like mud. And do it again. That looks nice in there. Do the same to the other side.
Now that both of those look great. Let's move along to cleaning up this area, which is where the tins are gonna ride. If this isn't cleaned up well enough, the tins are gonna sit too high and the pads are going to be frozen in the bracket. You could try to scrape it with a screwdriver. You can see all large chunks coming off. You could try with one of these little brushes, get off as much as possible that way. Or, of course, you can use something that looks a little bit more like this, a little sanding disc on there, and then just try to...That looks pretty great. I'm just going to feel for any raised edges. No, that feels really good. The only thing with using the sanding discs is you don't want to go in too deep, and, you know, if you take away too much of the metal, you don't want to take away any metal. You just want to get the rust. You could cause issues with the brake pads. That looks good. Let's do the same to all four corners. So, the next thing we need to do is apply a coating of Moly Grease right along these areas here that we just cleaned up. That way there, we can get these tins on here. Your kit came with a little thing of grease. It's great to use that. Make sure you save a little bit because you're going to need to use it on your slider pins as well. I'll set that aside. I've got a nice big jar with a nice brush. I like my brush, just a little bit. The reason for adding this in here is gonna help with vibration dampening, noise reduction, and, of course, keeping moisture away from those freshly sanded areas to help avoid it from rotting and building up underneath the tins.
Grab your tin and slide the ears right in there like that. At this point, don't think that you're done yet because you actually have to push down on this centerpiece as well. Right here, push that down right up against the caliper bracket. If you can't get your fingers in there, use a screwdriver or whatever you have to do. If you leave this up, the tin could come off and it could hit up against the rotor as it comes around.
That looks great. The next thing we're gonna do is get the boots on here. So, to do that, I'm going to continue on with a little bit of my grease. I'm gonna go right inside this hole, just like that. That's gonna prime that hole. Do the same to the other side, of course. All right. Take your boot. You've got the one with a little lip on it, and then the other side, use the lip and then put it inside here. You should be able to just kind of squeeze it in with your fingers. Give it a twist. If it pops back out, it wasn't seated properly. So, the twist is kind of important. I'm twisting it, it's not popping out. That looks good. Same to this side. Now, we're going to lube up those slider pins. Do the shaft area that goes in and out of the caliper bracket itself. And then you need to make sure you work your way all the way up to this edge that's very close to where my fingers are at least in one area. Get a nice little glob of grease up on there. That's super important because when we put this in that grease is going to go up along the lip of the boot where it connects to the slider, and then I'm going to twist it like this, and I'm going to work that grease around that whole lip. That's going to keep the moisture out 100%. This looks great, do the same to the other side. Make sure you clean up all that excess grease that might be hanging around. So, now, it's time to get the bracket back on the vehicle. Make sure that you have your caliper mounting bolts. And if you want to use some thread locker, we'll call it your prerogative. Go ahead and put both bolts in before you start...
Go ahead and get both bolts in and start them before you tighten either of them up. I'll just bottom these out real quick. Go ahead and torque these bolts to 76 foot-pounds. Torqued. So, we matched over our pads with the ones that we took out. We know that we had the wear indicator on the same side and that was facing down on the inward pad. Go ahead and put those into the bracket. That looks great. Now, we're going to take this little piece right here. It's got two little years. They're going to go into the holes in the bottom of the pad. This goes on the bottom side. That looks good. Next, we're going to take the caliper and we're going to add a little bit of that same Moly Grease lubricant on the piston itself, and then on the backside of these two ears as well. Once again, this is going to help with vibration dampening and noise reduction. Carefully slide it up and over these pads and then pushing your sliders as needed so you can get the caliper over them. This is looking great. Next, we're going to take our caliper to bracket bolts, tiny bit of thread locker, your prerogative. Bottom both of these out. Bottom them out. Torque these to 24 foot-pounds. Torqued. Let's get this bracket for the e-brake cable back on here. It's got a little ear, should fall into the hole. Grab your bolt, go ahead and bottom that out, snug it up. Tight. At this point, we're going to get the wheel on here. We're going to put all these lug nuts on and bottom them out and then we'll put the wheels onto the ground and torque them to manufacturer specification. The next thing we're gonna do is torque these five lug nuts to 80 foot-pounds. Torqued.
Once your wheels are torqued, you're gonna get inside of your vehicle and slowly pump up your brake pedal till it's firm. The next thing you want to do is under the hood. You're gonna come over to your master cylinder. You can open it up and take a peek inside. Once you can see where the level is, take a look from the side and you'll see a maximum line. You want it to be just about right there. Once you're sure that it's full, make sure that you close it back up there. There it is. Close the hood and take it for a road test.