Replaces

This part doesn’t fit a . Select from parts that fit.
Frequently bought together
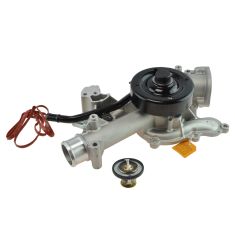
Part Details
Complete Repair in One Purchase - Stop searching for parts individually and complete your repair with a customized kit or set from DIY Solutions.
High-Quality Parts from Trusted Brands - DIY Solutions' kits and sets are selected from the best automotive brands and include hard-to-find and even obsolete parts you may need for your vehicle.
Guaranteed Fit - DIY Solutions ensures its selected parts are quality-tested to guarantee fit and function.
Item Condition:
New
Attention California Customers:
 WARNING: Cancer and Reproductive Harm - www.P65Warnings.ca.gov.
Lifetime Warranty
This item is backed by our limited lifetime warranty. In the event that this item should fail due to manufacturing defects during intended use, we will replace the part free of charge. This warranty covers the cost of the part only.
FREE Shipping is standard on orders shipped to the lower 48 States (Contiguous United States). Standard shipping charges apply to Hawaii and Alaska.
Shipping is not available to a P.O. Box, APO/FPO/DPO addresses, US Territories, or Canada for this item.
Expedited is available on checkout to the United States, excluding Alaska, Hawaii.
Final shipping costs are available at checkout.


Created on:
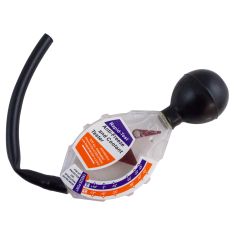
Tools used
Brought to you by 1AAuto.com, your source for quality replacement parts and the best service on the Internet.
Hi, I'm Mike from 1A Auto. I hope this how-to video helps you out, and next time you need parts for your vehicle, think of 1AAuto.com. Thanks!
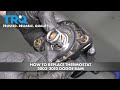
In this video, we're going to show you how to replace the thermostat and housing. This is a 2008 Dodge Ram with a 5.7 liter. You'll need a drain bucket, flat-head screwdriver, 13 mm socket, ratchet, and extension, as well as extra engine coolant. This can easily be done from the ground, but we raised and supported our vehicle and put a drain bucket under our radiator.Open the drain on the bottom of the radiator. Drain the radiator down enough so that you won't get any fluid coming out when you take off the radiator hose. Then also close your drain when you're done draining it.
Your upper radiator hose runs from the top driver's side of the radiator to the top driver's side of the engine. Disconnect the clamp on the engine side with a flat-head screwdriver. It appears that on this vehicle the hose is already replaced, so it has these screw style clamps. You may find that you have clamps that you use pliers, such as this style. Slide your clamp out of the way and remove the hose from the engine.
Remove the two 13mm bolts that hold the thermostat housing to the water pump. Remove your thermostat housing from the water pump. Using a flat-head screwdriver, pry the thermostat out of the water pump.
Before installing your new thermostat, ensure that your part has a new gasket on it. This is the only seal on the thermostat. There's no gasket around the bottom of the housing. Reinstall your thermostat housing and your two 13 mm bolts.
Reinstall your radiator hose onto the thermostat housing. Tighten down your clamp with a flat-head screwdriver.
Remove the radiator cap by pressing down and, turning counterclockwise two clicks. Fill your radiator with Mopar approved 50/50 coolant.
Any time you drain the coolant from your vehicle, you're going to want to properly bleed the system. To do this, fill your radiator and your expansion tank. Turn the heat on in your vehicle and let it run.
With the cap off, wait until you see all the air bubbles come out, constantly checking the fluid level until the fluid level remains stable without any bubbling or draining. Then you're safe to reinstall the cap.
Ensure that your heat's blowing hot air. You're ready to go.
Thanks for tuning in. We hope this video helps you out. Brought to you by www.1AAuto.com, your source for quality replacement parts and the best service on the Internet. Please feel free to call us toll-free, 888-844-3393. We're the company that's here for you on the Internet and in person.
Tools used
Okay friends, real quick before we get started on this job, hands and eyes, we're going to be dealing with chemicals. With that said, we want to make sure we drain the coolant and then we're gonna flush the system to make sure we can start off with brand new coolant by the time we're done. Let's go ahead and remove our radiator cap. Set that aside. Noticing that you have a plastic radiator and a plastic petcock, you might also find that the petcock just doesn't want to come out of there. If that's the case, obviously, you don't want to continue because you could damage the radiator. So we're going to move right along over here which is the lower hose to the thermostat housing. Remove the clamp. Just be prepared because coolant will come down. I like to put a nice funnel or a box carved out like this so it will direct it into a nice bucket. At this point, we're gonna slowly take this off of here and try to direct this into our recycling receptacle. The next thing we need to do is remove our two mounting bolts. You'll have one here and one right up there. That's going to get the thermostat housing out of the way. There's one. There's the second one. Give this a little shake, it should want to break free. A little bit more coolant coming out. There we are.
Now it's going to be time to get our thermostat out of the housing itself. Something I want you to pay attention to is this right here. We need that to line up with this area on the housing. So remember that when you go to install your brand new one. I'm just gonna take my screwdriver, come on the back side and just see if I can pop this out. There we are. Next thing we're going to want to do is clean up the surfaces on our housing so we have a nice clear area where the gasket's gonna ride. Now it's gonna be time to install our brand new thermostat. Pay attention to that little weep hole there, we want it to line up with this area right there. Go ahead and put it in. Squeeze it in so it's sitting flush. All right, let's get ready for our install into the vehicle. Now let's just go ahead and put something in the hole here to try to protect the area. Let's clean it up around the area where that gasket's gonna ride. Now that we have this area nice and cleaned down, let's go ahead and reinstall our thermostat housing here. Starting both the bolts, we'll snug them up and then we'll torque them to 112-inch pounds. All right, let's torque this. So now we're going to slip the hose on to the thermostat housing here until it's completely bottomed out against the housing. Once we get the clamp on there, we want to make sure it's approximately an eighth of an inch away from the end of the hose and of course we'll snug it up.
Gonna be time to fill the cooling system. You want a nice funnel like this and you want to make sure you use the proper coolant. You want to use coolant that's either orange or of course, the universal coolant, but definitely not green. I'm gonna go with universal here. I'm gonna fill it right up. Now after you've run your vehicle for a while and you've burped out all the air in it, you want to make sure you go ahead and put your radiator cap back on here. Push this right down. Turn it so it's nice and tight. And now we're going to fill the overflow. Okay, close the hood. Take it for a road test.
Tools used