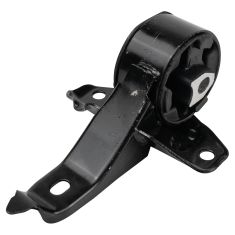
Replaces
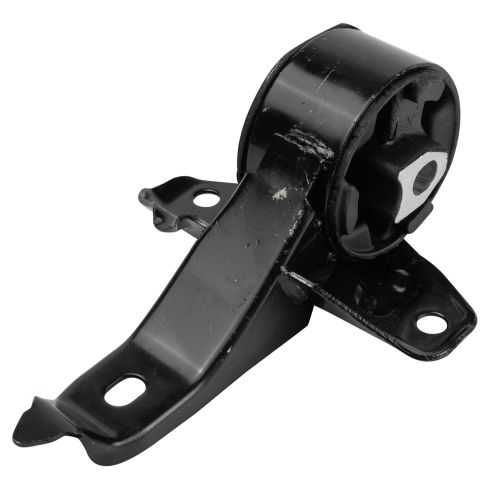
This part doesn’t fit a . Select from parts that fit.
Frequently bought together
Item Condition:
New
Attention California Customers:
 WARNING: Cancer and Reproductive Harm - www.P65Warnings.ca.gov.
Lifetime Warranty
This item is backed by our limited lifetime warranty. In the event that this item should fail due to manufacturing defects during intended use, we will replace the part free of charge. This warranty covers the cost of the part only.
FREE Shipping is standard on Orders shipped to the lower 48 States (Contiguous United States). Standard shipping charges apply to Hawaii, Alaska and US Territories. Shipping is not available to Canada.
Expedited is available on checkout to the United States, excluding Alaska, Hawaii and US Territories as well as P.O. Boxes and APO/FPO/DPO addresses. Final shipping costs are available at checkout.
Created on:
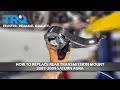
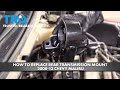
Tools used
Tools used
Okay friends, to get started on this mount, I want to let you know you're gonna have to be working underneath the vehicle. So you need to safely raise and support the vehicle so you can get underneath here. And we're gonna be looking right along the back, right here. What we actually need to do as well, though, is we need to put a little bit of pressure underneath the engine. You don't want to go underneath the oil pan specifically, and you definitely don't want to go underneath the transmission pan. Go to this area right here, use a nice piece of wood, jack up, put a little bit of pressure right there, and that's perfect.
Now to get out the center bolt on your mount, you're gonna need to remove your left front wheel. It's going to be much easier to just come through the wheel well area.
The next thing we need to do is start loosening our bolts. I like to start loosening this one, but I'm gonna leave it in a little bit, and then I'll go ahead and move up to loosening the top two. Okay. It's almost out. There's one, two, three.
So now we need to make our way back up on top of the engine. What we need to do next is get this bracket off of here. Before we can get the bracket off, we need to go ahead and get our shifter cable off of here. You can use a little forky tool like this, small pry bar, screwdriver, whatever you need to do, but be careful and try to pry right in between here and there and just lift this right on up. It should want to break free. There we are. We'll set that aside.
The next thing you want to do is remove the bolt that's located right here, right on the other side of this plug. And then you're gonna find another one that's located right down here. You can see my tool. I already have it loose, so hopefully, you can see it easy. Get this front one out of here. Now we'll get that lower one, our rearward one.
The next thing we need to do is follow our O2 sensor wire right down to here. We're gonna disconnect it. I like to just kinda dismount it from where it's lodged onto. It makes it much easier to get to. Pull the blue lock off of there. And I'm just going to separate the two. There we are. It's going to give us a lot of slack right up here. So now we can lift up on this a little bit. I'm just going to try to maneuver it around. There we are.
Now, we want to get our cable out of the way. There we are. There it is, friends.
Now it's gonna be time to install our brand new rearward engine mount. Let's go ahead and slide it right down along the backside of the engine. And we're just gonna see if we can get it to weasel past all these parts and set into approximately where it needs to go. There we are.
At this point, it's gonna be a little bit easier to do from the bottom. Let's get under. So we're underneath the vehicle. I'm just gonna take one of these bolts and I'm gonna start it in on this bottom one. And then we'll take that center bolt that goes through the mount, and start that one in as well.
Now let's put in those other two bolts. So let's snug these up. Okay. I've bottomed out, give it a little bit more. That feels good. Do the same to all three of these. Let's tighten up this center bolt. Okay. That's bottomed out. Make sure it's nice and tight. Let's reconnect our O2 sensor. Make sure you put your little blue lock back in there. Let's re-secure that back in.
Now, it's gonna be time to remount our transmission gear selector cable bracket. We have the one thick bolt that goes right behind the transmission check hole. It's gonna go right here. The longer bolt is gonna go through right here, and then into the bracket right there. Once you have them both started, let's go ahead and snug them up. That's bottomed out. Give it a little extra. That's nice and tight. Now let's do the forward one.
Okay. Bottomed out. Teeny bit more. Now it's gonna be time to get our cable back onto here. To do that, just kind of line it up. And then I would just use a pry bar or this nice long screwdriver and push it down. You just want to be careful because it is only made of plastic. There it is. It clicked in. You want to double-check it and make sure it's 100% secure. Make sure that does not come off of there.
Now it's gonna be time to get our engine cover back on. Something that I like to mention is if you look at your throttle body and you see this rubber gasket still on there, you need to remove it, and you need to set it on here. If you look at it, you can see where the clamp area is. We need it to line up with this slot coming across here, because that's how you'll tighten it. Just take it, slide it right on there.
Make sure it's secure. Make sure your clamp's nice and loose, but it isn't fully removed. You definitely want to make sure that it's gonna be able to tighten up once you get it on. Take a look down inside your throttle body. Just make sure you don't have any debris inside there. If you do, just take a nice clean rag, give it a little wipe, but be careful not to press down too hard on that butterfly valve.
Now we're gonna take this. We're going to line it up with the throttle body under there, coming from an angle. Slide it down, give it a little wiggle as you go, and then line up the hole for your oil fill. I like to use a mirror so I can double-check to make sure it's down all the way. If it isn't, of course just make sure that it is before you go ahead and tighten up that clamp.
Let's tighten that up. Let's get our hose reconnected here. Should line up all three of these points. Snug that. Time to reconnect this hose. Let's get our oil cap back on here.
Now just give this a nice tug. Make sure it's 100% secured. You definitely don't want the clamp under here loose or this clamp right here loose. So now that we have everything back together, it's a great idea to double-check everything that you took apart. Make sure you reconnected that O2 sensor, make sure you tightened up all your bolts, and double-check those clamps. Everything needs to be tight. Once you've done that, take it for a road test, check for noises, and make sure there's no check engine light.