Replaces
This part doesn’t fit a . Select from parts that fit.
Frequently bought together
Part Details
Product Features
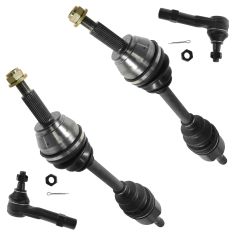
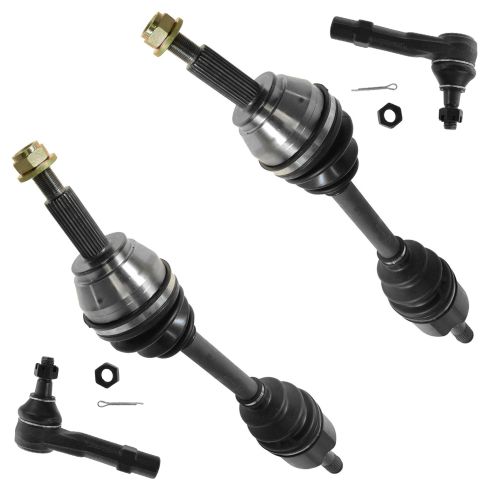
TRQ drivetrain kits are manufactured using premium raw materials to restore original performance. Each TRQ drivetrain component is designed to be a direct, maintenance-free replacement to the stock unit. To extend the service life of your drivetrain, TRQ recommends replacing wheel hubs, bearings, and constant velocity (CV) drive axles at the same time to ensure even wear of components and improved ride comfort. All products are fit and road-tested in our Massachusetts R&D facility to ensure we deliver on our promise of Trusted Reliable Quality.
Install Tip: When replacing steering components, have a professional alignment performed afterwards. This ensures proper tracking and even tire wear.
Our steering and suspension components are pre-greased and sealed for long life and do not require the extra maintenance typically required by greaseable versions.
Item Condition:
New
Attention California Customers:
 WARNING: This product can expose you to chemicals including Lead and Lead Compounds, which are known to the State of California to cause cancer, and birth defects or other reproductive harm. For more information, go to www.P65Warnings.ca.gov.
Lifetime Warranty
This item is backed by our limited lifetime warranty. In the event that this item should fail due to manufacturing defects during intended use, we will replace the part free of charge. This warranty covers the cost of the part only.
FREE Shipping is standard on orders shipped to the lower 48 States (Contiguous United States). Standard shipping charges apply to Hawaii and Alaska.
Shipping is not available to a P.O. Box, APO/FPO/DPO addresses, US Territories, or Canada for this item.
Expedited is available on checkout to the United States, excluding Alaska, Hawaii.
Final shipping costs are available at checkout.


Created on:
Tools used
Brought to you by 1AAuto.com, your source for quality replacement parts and the best service on the Internet.
Hi, I'm Mike from 1A Auto. I hope this how-to video helps you out, and next time you need parts for your vehicle, think of 1AAuto.com. Thanks!
In this video, we're going to show you how to replace a front CV axle shaft on this 2003 Mercury Mountaineer. We'll show you on the passenger side, but the driver side is the same procedure. The items you'll need include a new front CV axle shaft from 1AAuto.com, 16mm, 18mm, 19mm, and 30mm socket and ratchet, a piece of pipe for extra leverage, jack and jack stands, torque wrench, and a pry bar.
Remove the center cap using a screwdriver. Then the hub nut is a 30mm nut, and you can use a ratchet with a pipe. If you have a breaker bar, something with more leverage, you can do that. You basically want to remove the nut the whole way at this point. We'll just fast-forward as Mike removes those 19mm lug nuts. If you don't have air-powered tools, you want to loosen them while the vehicle's on the ground, raise the vehicle, and remove them the rest of the way. Now you can pull the wheel free.
Now remove this 18mm nut. We'll fast-forward as Mike does that, and you can see he's using a piece of pipe for some extra leverage. Once you remove that nut, just put it back on a few threads. Then take a hammer and hammer your wheel knuckle. You want to do this until it breaks free and slides down by itself.
On the back of your axle here, just place a pry bar. Just hammer the axle out. Now remove that 18mm nut and pull your wheel knuckle forward. You want to make sure that the axles free, so that it won't get damaged. Remove the stabilizer link. We're just showing you the driver's side. You use 15mm socket and ratchet on top and the 16mm socket and ratchet on the bottom. Remove that top nut. Take the link bolt out, and remove the link. That's if everything works out. On the side we're working on its broken, so we use some penetrating oil.
One thing you do is - this is pretty typical - it breaks off up top here, you saw where you just filled it up with penetrating oil, and then we're just kind of messing around with it. We lock some locking pliers onto it. Now we've got that penetrating oil really helped the bolt start up. We've basically broken the plastic here. Now this plastic tube will slide off. We're just going to use a hammer and chisel to remove the rest of the plastic, this of course is worst case scenario. You just want to remove the plastic then use some locking pliers. Then just remove the nut on the bottom, or at least loosen it up as much as you can. Then just hammer this down and put. Turn your wheel. Then come back here and just pull your axle out. Then slide it back, and pull it out of the hub. Then push it down and out of the control arm.
To reinstall the axle, feed it kind of off to the side of the differential case, and then in. Once you've got it into the hub, just replace that hub nut. Just kind of tighten it up preliminarily. Then take the back end of the axle, and feed it back into place. You just want to keep pushing and moving it up and down, and pushing back until it goes all the way back into place.
Push the stud back into the wheel knuckle. Then replace that 19mm nut. Make sure your axle's pushed all the way back in. It should just feed right back into place. Then tighten up that 19mm nut. Then just torque that nut to 90 ft lbs.
Next, I'm going to reinstall the sway bar link, and you want to jack up the other side just slightly. Now replace your sway bar link. The other it should go in is washer, bushing, control arm. Then bushing, washer, the tube. Then another washer, then the bushing, then your sway bar. Then another bushing, another washer, then the nut. You want to just tighten that nut preliminarily, then release the jack.
To tighten these up, you want to have the car, I've got the jack stands supporting the control arm, and the car pretty much level, so it's at its ride position. Then you just want to tighten this up until all of these bushings are just squeezed down, and they're contacting the washer as well.
Replace your wheel. Then replace all the lug nuts and tighten them preliminarily. Then you'd want to lower the vehicle and tighten them the rest of the way. Then torque each of these in a crossing pattern, to 100 foot-pounds. Now torque that hub nut to 180 foot-pounds. Now replace your hub cap. Just line it up and hit it back into place.
We hope this video helps you out. Brought to you by www.1AAuto.com, your source for quality replacement parts and the best service on the Internet. Please feel free to call us toll-free, 888-844-3393. We're the company that's here for you on the Internet and in person.
Tools used
Tools used
Tools used
Brought to you by 1AAuto.com, your source for quality replacement parts and the best service on the Internet.
Hi, I'm Mike from 1A Auto. I hope this how-to video helps you out, and next time you need parts for your vehicle, think of 1AAuto.com. Thanks!
In this video, we're going to show you how to replace an outer tie rod on this 2003 Mercury Mountaineer. We show you on the passenger side, but the driver side is the same procedure. The items that you need for this is a new outer tie rod from 1AAuto.com, a 7mm, 19mm, and 21mm socket and ratchet, a piece of pipe for some extra leverage, two adjustable wrenches, a pair of pliers, a hammer, a tape measure, jack and jack stands, and a torque wrench.
Pry off the hub cap by using a flat blade screwdriver in the small slot on the side. Once you get it started, you can just pull out around the edges. If you don't have the benefit of air tools, you'll want to start with the vehicle on the ground, loosen the lug nuts, then raise and support the vehicle on jack stands. Remove the lug nuts, wheel, and tire the rest of the way.
There's a small indent on the inner tie rod. Put the tape measure there and measure out to the center of the grease fitting, which is 9-1/16" in this vehicle. Then, just bend off the legs on your cotter pin on the bolt. Then just pull the cotter pin out with a pair of pliers. Then, using a 19mm socket and ratchet, just remove this nut. Spray this nut with some penetrating oil, and then, using two adjustable wrenches, just separate it. Once it turns, it's loosened up, and you can hammer your wheel knuckle until you see the outer tie rod move. You can see it move right there.
Now you can pull it up and out of the knuckle and twist off the outer tie rod. Up top is the old outer tie rod, and below it is the new one from 1A Auto. You can see they're identical, and they'll fit exactly the same.
For lineup purposes, ideally what you want to do is be able to remove this without turning the inner tie rod. Our bolt or nut didn't come loose. That's not a big deal, but it does mean that we will need to take this and have it aligned because we did turn the inner tie rod a little bit, but we can still put it back together. We'll fast-forward as Mike twists on the new outer tie rod. Remove the nut and then line up the outer tie rod with the hole on the wheel knuckle. You may need to move the wheel knuckle around a bit until it goes down in place. Once you get it in, replace that nut and then just tighten it up. You want to tighten this to about 50 foot-pounds. Once it's fully tightened, make sure the hole lines up with the castle nut, and you may need to turn it a bit more so that it lines up, and then just push your cotter pin through and bend the tabs in opposite directions.
Tighten that nut back on to the outer tie rod using your two adjustable wrenches. Put in your new grease fitting and tighten it up with a 7mm socket and ratchet. Now, just add a few squirts of grease into the grease fitting. Replace your wheel, and then replace all the lug nuts and tighten them preliminarily. Then, you'd want to lower the vehicle and tighten them the rest of the way and torque these in a crossing pattern to 100 foot-pounds. Replace your hub cap, and we recommend you have your front alignment checked and adjusted if necessary.
We hope this video helps you out. Brought to you by www.1AAuto.com, your source for quality replacement parts and the best service on the Internet. Please feel free to call us toll-free, 888-844-3393. We're the company that's here for you on the Internet and in person.
Tools used
Brought to you by 1AAuto.com, your source for quality replacement parts and the best service on the internet.
Hi, I'm Mike Green. I'm one of the owners of 1A Auto. I want to help you save time and money repairing and maintaining your vehicle. I'm going to use my 20+ year's experience restoring and repairing cars and trucks like this to show you the correct way to install parts from 1AAuto.com. The right parts installed correctly that's going to save you time and money. Thank you and enjoy the video.
In this video we'll be replacing the tie rod on this '98 Explorer same as any '95 to '01 Explorer, Navajo, and Ranger, Mazda B Series pickup, and really this is a procedure that is similar for most cars.
Tools you'll need on the Explorer: jack and jack stands, 8mm, 13mm, 15mm, 19mm, which I forgot there, 21mm sockets and ratchet, pliers, a tie rod puller which is the right way to do it. You can use a hammer but you have to be careful. Loctite, a red or black marker, and two large adjustable wrenches.
So obviously you're going to want to jack up and secure your vehicle. You can just work a screwdriver in there to pry off your cap, and these are 19mm. If you don't have impact tools, loosen your lug nuts on the ground, then raise your vehicle and secure it with a jack stand, and then remove the lug nuts. Once the lug nuts are off just pull the tire right off, and there's four bolts that basically hold the brakes on. There's one here 13mm, and one up here, and those just hold the calipers to this big bracket. There's also a 15mm bolt here, and a 15mm bolt right up here. We're just going to speed through removing those four bolts, and you pull the caliper up and off and you can wire tie it up top and then that bracket comes off with the 15mm bolts, and we'll pick it up from there.
This bracket then comes right off, and your rotor comes right off. You're going to want to take off this dust shield and its 8mm bolts. Remove this cotter pin with a pair of pliers. Needle nose usually works best but usually the best thing to do is just grab hold and break off the pin on this side. It's a 21mm bolt, and actually give it a good tug. It does come easy. We'll put our puller on there. Now you could just use a big hammer and pound this through, but we want be very careful. If you go that route, you don't want to mushroom the end of this, and then it actually won't go through your steering knuckle. Now really this is using the tie rod ball joint puller is the best way, and you'll end up tightening this up good, and pretty soon it will pop. There it goes. A couple of big adjustable wrenches here. I'll fast forward a little here as I try and mess with it to try and get the best angle to both get a good pull on the wrenches and still be able to see it with the camera.
So that's off so now I'll lock this one onto here. The new tie rod does come with a new nut here so what I'm going to do is mark really well where this nut was so that when I put the new one on I know to go right up to where I put the red marks. I'm going to put just a little bit of Loctite on here, some down here, and put the new nut on. You can tell pretty well where it was. What you want to take into account is if either this nut or the length of your new tie rod is any different, you want to adjust the position of this nut. So if your tie rod is a little shorter, you adjust it out a little bit, or if the tie rod was a little longer than your original adjust it back in. So that's about where my old one was.
Now I'll put the new tie rod on, and you want to make sure you hold this. You don't want this twisting because that is adjustment as well, and if you do this this should give you a pretty good initial alignment. I recommend you go get an alignment so you don't wear out your tires too quickly or end up wearing out the new tie rod or wearing out your ball joints or anything like that if you car's not aligned correctly. Start my bolt down here to hold this in place. Now I want to tighten the lock nut up here really good. So I'm going to now tighten up this nut to about 75 foot pounds, and tighten it up a little more to get that and get my cotter pin right through there. The cotter pin you just take it and yank it right around. Then last but not least we'll put in our grease fitting and take our pliers and tighten that up. It comes pre-greased, but you can fill it up with grease, and now we can put everything back together.
We'll kind of fast forward putting that brake shield back up and tightening up those three 8 mm bolts. We'll also fly through putting the brakes back together and your wheel back on. A couple of notes, again, you probably would want to get a alignment after you've done any steering or suspension work like this, and then also just the first time you drive your car just be very careful. You've worked on the brakes. You've worked on the steering. So make sure your car is stopping before you go fast, and make sure that there is no looseness or anything in the steering before you road test it.
If you do want to see putting your brakes back together in regular motion, just check out our front brake video. We'll put the wheel back on. Put your lug nuts on. Get them snug then lower your car to the ground. Torque them up to 90 to 100 foot pounds. Replace your cap, and you're in business.
We hope this helps you out. Brought to you by www.1AAuto.com, your source for quality replacement parts and the best service on the internet. Please feel free to call us toll free, 888-844-3393. We're the company that's here for you on the internet and in person
Tools used