Replaces
This part doesn’t fit a . Select from parts that fit.
Frequently bought together
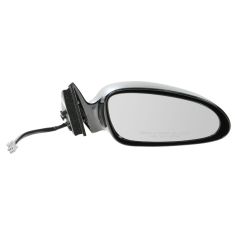
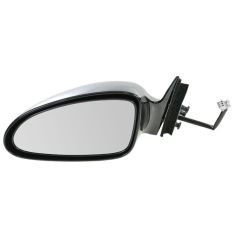
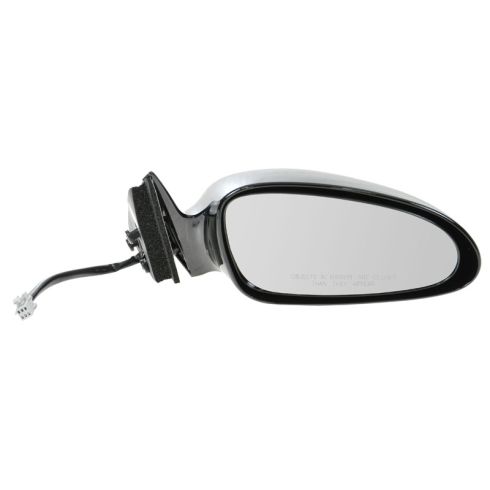
Part Details
TRQ side mirrors and mirror components are designed to match the function, fixture, and performance of the original version for easy installation. TRQ mirrors are DOT certified, comply with all federal safety standards, and are independently lab tested to ensure our products comply with all government regulations. All products are fit and road-tested in our Massachusetts R&D facility to ensure we deliver on our promise of Trusted Reliable Quality.
Product Features
Exact fit - To obtain proper fit and function confirm your vehicle has the exact mirror options listed.
Paint To Match Note:
"Paint-to-match finish" refers to a smooth, paintable surface. This item is not painted. Paint offers better coverage and adhesion, but it is not necessary for installation.
Item Condition:
New
Attention California Customers:
 WARNING: This product can expose you to chemicals including Chromium (Hexavalent Compounds), which is known to the State of California to cause cancer, and birth defects or other reproductive harm. For more information, go to www.P65Warnings.ca.gov
Lifetime Warranty
This item is backed by our limited lifetime warranty. In the event that this item should fail due to manufacturing defects during intended use, we will replace the part free of charge. This warranty covers the cost of the part only.
FREE Shipping is standard on Orders shipped to the lower 48 States (Contiguous United States). Standard shipping charges apply to Hawaii, Alaska and US Territories. Shipping is not available to Canada.
Expedited is available on checkout to the United States, excluding Alaska, Hawaii and US Territories as well as P.O. Boxes and APO/FPO/DPO addresses. Final shipping costs are available at checkout.

Created on:
Tools used
Brought to you by 1AAuto.com, your source for quality replacement parts and the best service on the Internet.
Hi, I'm Mike Green. I'm one of the owners of 1A Auto. I want to help you save time and money repairing and maintaining your vehicle. I'm going to use my 20 plus years experience restoring and repairing cars and trucks like this to show you the correct way to install parts from 1AAuto.com. The right parts installed correctly, that's going to save you time and money. Thank you and enjoy the video.
In this video, we're going to show you how to remove and replace a mirror. This is a 2003 Monte Carlo they're working on. This procedure is the same for any 2000 to 2007 car. The tools you're going to need are a Phillips screwdriver, a T27 Torx driver, a flat blade screwdriver, a putty knife and rag and a 10mm socket and ratchet.
To remove the door panel, first you're going to remove four screws. One Phillips here, a Philips here and then there's two T27 Torx screws right up in here. Now that you removed those screws you can pull out on this panel and then forward and it comes off. Then you switch, you use a regular flat blade screwdriver and pry out on one side and pull the switch out some. Then pull the whole switch and pry the other side. Now you want to use a putty knife and a rag or a paper towel or something just to kind of protect the paint. Work it back in here and then work it up right into there and then pull. Once you get that one, this panel kind of actually pulls free pretty easily. Just pull around the outside edge.
Then lift up and your door panel's off. You still have your mirror and your power window connected here. Looking in from behind, a little hard to shoot this. Basically, there's a tab in the back of your connectors here. You want to work your screwdriver right up in there. You're going to pull. I can show you it afterwards here. Basically, what you're doing is right here is where the tab goes in, so you're just working y our screwdriver in there and working it in there to release that tab. These connectors, you can see right there, that's what you want to be pressing in. Now your door panel's off.
Your power mirror connection, is right here, this little thumb tab. Push that in and then work that off and just pull this whole pad out and you have three 10mm nuts holding it on right there. I just hold on to the mirror while I'm doing the last one here. Then obviously, if your mirror's broken you're not doing that careful but pull the mirror out. Just for comparison purposes, here is our original mirror. Here's the new mirror for 1A Auto. You can see they're exactly the same. The mounting surfaces are exactly the same and plugs, if I can line up there, are even the same so your new mirror from 1A Auto is going to bolt on with no problem.
Obviously, on this car this original mirror is fine so we'll put that back on. The installation's just in reverse. Make sure you put the harness through. Let me put it in. Obviously, the top nut first. Make sure it's held on there. I'll hand tighten these first and then I'll tighten them up with wrench. You want them snug but they don't have to be incredibly tight. The mirror base is Diecast so you don't want to break it. Too tight could break it. Stuff this back in. Reconnect my connection. We're ready to put the door panel back on.
I'm just going to kind of fast forward through putting the door panel back on. You can probably pick up enough to get it on pretty easily here. Plus, if you already took it off, getting it on is not that big of a deal. If you did want to see this video in regular motion we do have another video for the door panel remove and replace. Just remember at the end to just check everything. Make sure your door locks and your window and your mirror's all working right. We hope this helps you out.
We've tested everything - window, mirror, door locks. Everything's good.
We hope this helps you out. Brought to you by www.1AAuto.com, your source for quality replacement parts and the best service on the Internet. Please feel free to call us toll free, 888-844-3393. We're the company that's here for you on the Internet and in person.