Complete Repair in One Purchase - Stop searching for parts individually and complete your repair with a customized kit or set from DIY Solutions.
High-Quality Parts from Trusted Brands - DIY Solutions' kits and sets are selected from the best automotive brands and include hard-to-find and even obsolete parts you may need for your vehicle.
Guaranteed Fit - DIY Solutions ensures its selected parts are quality-tested to guarantee fit and function.
Assemblies may include halogen or incandescent test bulbs that should be replaced before installation.
Features and Benefits
Direct Fit - No vehicle or wiring modification necessary
DOT, SAE, and FMVSS Compliant - Meets on-road use regulations
Matching set for a restored look
Item Condition:New
Attention California Customers:
WARNING: This product can expose you to chemicals including Chromium (Hexavalent Compounds), which is known to the State of California to cause cancer, and birth defects or other reproductive harm. For more information, go to www.P65Warnings.ca.gov
Lifetime Warranty
This item is backed by our limited lifetime warranty. In the event that this item should fail due to manufacturing defects during intended use, we will replace the part free of charge. This warranty covers the cost of the part only.
FREE Shipping is standard on orders shipped to the lower 48 States (Contiguous United States). Standard shipping charges apply to Hawaii and Alaska.
Shipping is not available to a P.O. Box, APO/FPO/DPO addresses, US Territories, or Canada for this item.
Expedited is available on checkout to the United States, excluding Alaska, Hawaii.
Final shipping costs are available at checkout.
How to Replace Headlight 1997-99 Toyota Camry
Created on:
Tools used
Flat Blade Screwdriver
Phillips Head Screwdriver
10mm Socket
Ratchet
1. To replace the bulb
Unplug the connector
Remove the dust cover.
Move the wire to the side.
Pull the headlight bulb out and replace it.
2. Remove the headlight assembly
Remove the parking light with a flat blade screwdriver and a rag.
Unplug your parking lights and set them aside.
Unplug/remove the bulbs.
Remove the two 10mm bolts on the headlight assembly.
Unclip the headlight assembly from the adjustor.
3. Install headlight
Clip the headlight assembly back onto the adjustor.
Use your 10mm socket and ratchet and bolt the assembly back in.
Put the bulbs back in and plug them in.
DO NOT TOUCH the bulbs- the oil from your fingers will burn into the light and foul your bulb.
Re-install your parking light.
Line it up and clip it back in.
Brought to you by 1AAuto.com your source for quality replacement parts and the best service on the internet.
Hi, I'm Mike Green. I'm one of the owners of 1A Auto. I want to help you save time and money repairing or maintaining your vehicle. I'm going to use my 20-plus years experience restoring and repairing cars and trucks like this to show you the correct way to install parts from 1AAuto.com. The right parts, installed correctly that's going to save you time and money. Thank you and enjoy the video.
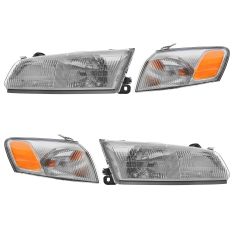
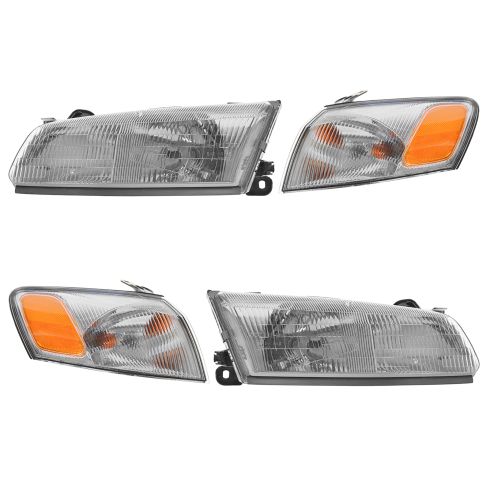
In this video, we'll show you headlight replacement on a 1998 Camry, same as '97 to '01 Camry's. In this video, I'll quickly go through just replacing the bulb for those that might be looking at it for that, and then get into replacing the headlight itself as well. The tools you'll need are a regular flat blade screwdriver, a small flat blade screwdriver, and a 10 mm wrench or socket and ratchet. If you tuned into this just to see how to replace the bulb, I'll do that for you real quick. You look in at the back of the passenger side headlight, here's the washer bottle. You simply pull your connector off. Then you pull this dustcover off. Then this wire, basically, locks the headlight in. You move it to the side and your headlight comes out. Then to replace it, do the same thing. Take the wire, push it in, then lock it into place. Replace your dustcover and plug in your bulb.
It's the same on the driver's side. It is a little more difficult to get to. Remove the parking light by using a screwdriver. There's a little clip right here on top. You pull the middle of the clip up, and then you can kind of get under the clip and pull it out. Then actually at this point, the parking light is just clipped into the headlight and the fender, so you want to firmly- it's a little hairy here- but just firmly pull out on it. Now I'm going to unclip from the fender. Put the rag on the headlight and reach in and gently use the headlight and pop it off. Then the bulb twists out of the parking light.
To remove the headlight, you could reach back in here and unplug just pulls off, the connector just pulls off the back of the headlight. Then there are three, or actually to get it off, there's two 10 mm bolts, here and down here. I'm going to take those off real quick with the air ratchet. You can just use a regular wrench. Here, the easiest way to get this apart here, there is a 10 mm bolt here that you could undo, but this is actually clipped in, so I found the easiest way to get it apart take your screwdriver. What I'm going to do is I'm going to pull; I'm going to apply some pressure this way with my fingers and pry down and then pry up on the teeth. Then I can pull the headlight out.
At this point, if this adjuster is damaged because you had a little accident or something, you can remove it. To get it out, there's a little lock that locks on the bottom. What you'll need is a little screwdriver. There's a slot here that you push the screwdriver through and pry up. Then take a larger screwdriver and work it, basically pry it out. If your adjuster here, though, is in good shape, there's really no need to remove it. I'd only do this step if this adjuster is broken. If your old adjuster is in good shape, there's no reason you can't just leave your old adjuster in there like that.
To reinstall it, put it in. Get that adjuster in. Lock that one on. Get that in place and push it down. Then we're going to put in our bolts. Bolt it in here. This bolt let me use the magic of my power tools. Again, you never want to tighten with a power tool. You only want to tighten by hand so you can control how tight they are. Then I reach in behind and plug the light back in.
Now we'll install the parking light. To install the parking light, put the bulb back in and twist to lock it. Then you have a tab here that's going to go into here, and then this tab that's going to go into the headlight. First, you got to work that underneath. Put the light up against the fender, up against the headlight. Get those back in. Then you've got your clip. Pull the middle up. Push the clip down, and it's locked in place. There you go.
Brought to you by www.1AAuto.com- your source for quality replacement parts and the best service on the internet. Feel free to call us toll-free, 888-844-3393. The company that's here for you on the internet and in person. Thank you.
LHT04086
In Stock
Product Reviews
Loading reviews
4.85/ 5.034
34 reviews
5 Stars
4 Stars
3 Stars
2 Stars
1 Star
30
3
1
0
0
Great improvement to car
Kevin
May 2, 2017
Really like this product-however video left out a few things like driver side replacement (mentioned as different but needs to be seen and demonstrated). Also snap tabs that came off easily in 98 toyota were changed in 99 on driver side to nearly impossible to pop out. But overall video was very helpful showing all locations to loosen/remove old lights (headlight and turning light). After changing driver side that took me almost 50 minutes with pop up tab problems, only took 15 minutes to change passenger side lights with experience learned from driver side. Video was helpful.
Toyota headlamp kit
G
August 15, 2017
Terrific. Looks great. Popped in quickly. Buy this headlamp set. A great deal...
Cannot aim them to road level
S
September 18, 2017
The lamps are crystal clear and fit the vehicle perfectly. However, on the set I received, there was a significant flaw that did not allow me to be able to aim the headlamps low enough to actually get the beam onto the road surface. Each time I would adjust the vertical adjuster screw, just when the beam would get low enough in the arc to almost work, the small ball on the ball on the front of the adjuster would pop out of the nylon retainer, and you would have to remove the lamp assembly and start all over. I tried this 4 times with both headlamps without success. I removed the adjusters and checked them for visible flaws, and finding none, I transferred the complete adjuster assemblies from the OEM lamps that I was replacing, (Not an easy thing to do without breaking old plastic) and immediately was able to aim the new lamps. I am suggesting that there is a flaw somewhere in the product that either places too must pull on the adjuster/ball/retainer where it locks into the bottom
Good headlight replacements
N
September 20, 2017
This product came and was easy to install. However, I had to spend a few nights adjusting the focus of the headlights which is an easy process. I would recommend these for others that have faded lights.
Camry Headlight Kit
G
January 25, 2018
Parts arrived on time, great price too. I found that the headlight installed alot easier if the 2 adjusters are moved almost all the way in. This makes more room behind the bumper for the headlight and allows the rubber strip on the bottom to fit in behind the bumper. If the rubber strip was on top of the bumper, the headlights fits way too tight and would not adjust. Very happy with this purchase, installation was quick, thanks to the video.
Perfect fit
William
February 3, 2018
The kit came with all bulbs, the lenses look sturdy, and all connectors fit exactly as needed. Be careful removing the push-pins for the turn signals. Those can age an break and the kit does not contain any fasteners.
1999 Toyota Camry Headlight review
S
February 7, 2018
Good quality product and perfect fit on my 1999 Toyota Camry for the OEM replacement headlights! Would recommend.
Feeling good about my purchases
Thomas
May 17, 2018
This is the second product that I have purchased from here and I'm satisfied so far I'm in route to purchase more very soon so keep up the good workWrite
Camry headlights
P
August 9, 2018
I watched the 1A Auto video on how change out my 98 Camry headlight, and park light housing. It looked like it was something that I could handle, so I put in my order with 1A Auto, and I had the needed parts in just a few days. The replacement lights fit like a charm. I was impressed with the ease of ordering on 1A Auto, the quick delivery time, and the quality of the product.
replacement head light housing
Eric
September 30, 2018
GGreat price for all 4 sections of head light housing plus free shipping! Can't wait to see the difference, as my 97 Camry has yellowed lenses!
Thanks for the fast shipping!
1A = Great Parts AND Great Customer Service
John
November 30, 2018
Having used 1A for previous ordered, I ordered my parts before full investigation to the extent of damage. After doing so, I discovering that the damage was too great to repair. After consulting with a service rep, they issued an RMA and all I had to pay was return shipping for what I had ordered.
Headlight Assembly for 1999 Toyota Camry
victor
December 19, 2018
Purchased a set of headlight assemblies after watching the how-to video to install. Video made installation quick and very simple. Parts are great quality and even better price. Will definitely order again from 1A Auto. Highly recommend!
Perfect fit.
Beth
January 12, 2019
Ordered new front headlamps for my daughter's '97 Camry. Easy install and website included easy to follow video. They were a perfect fit.
headlights for 98 camry
tom
January 13, 2019
I am so happy with these lights, were a perfect fit at a portion of the price from the shop and they arrived within a couple of days.
perfect fit
greory
March 28, 2019
watched your video on youtube and got the lights in pretty quick and took about twenty minutes to replace them and must say your video are great and to the point.
Headlights
Fransisco
August 17, 2019
The product was real good not very hard to install would purchase again.
Excellent 1A Auto review *****
Richard
December 15, 2019
I purchased the four piece lighting kit for my Toyota Camry. My old lights were yellow and cracked.
The parts I received are of high-quality and with the use of 1A Autos videos I was able to install the lighting kit quickly and easily. I am very pleased and would recommend 1A Auto to anyone who needs car parts.
Mahalo!
Job Well Done!
Robert
December 21, 2019
Great match on the headlights and side lights. I was very impressed with the care that went into the packing . The lights did come with bulbs which was an unexpected surprise. I only needed the driver's side but am happy I ordered both so I have a matching pair. I saw a less expensive choice, but chose to go with !A because of the great videos on you tube. Glad I did.
L
May 6, 2020
Fixing up my car and the headlights helped out a lot and they look new
Excellent kit
Z
August 16, 2020
The fit was great and it came with all new light bulbs. One of the easiest things to install. If you have fogged up headlights come on down to 1A Auto and theyll give you the parts you need to fix you up right.
My purchase of headlight and side light assemblies for my 98 Camry was a TOTAL success!!
P
November 6, 2020
I love my 98 Toyota Camry, have put a few thousand into it in the last two years to have it last another 10. Headlight and sidelight assemblies were less than perfect soI decided to replace them. The parts from 1AAuto arrived over night, were perfect matches to original equipment, and had a video on 1AAuto which made installation even easier. I am an Amazon devotee and order many parts from them. 1AAuto has begun to spring me free for quality, speed of deliver, installation videos, and overall excellence of service. Thanks!! Peter Castaldi
Now I can see..
Cheryl-Tate
January 27, 2021
I purchased 4 Pc headlights and signal lights for my 1999 Camry. I am so happy with my purchase! I thought I was going blind!! Thank God Im not. The order was easy, they arrived quickly. Thank you A Auto, you rock.
Do it yourself VIdeo
Luis
March 27, 2021
I purchased 4pc Headlight and signal light for my 1998 Camry and the video showed me every step to take to remove old lights and replace it with new ones and it worked perfectly... Thanks
Perfect
Robert
April 4, 2021
Product came in early. Fit my car perfect. Will be back to order again.
Right part
Jonathan-
April 21, 2021
Right part an glad video is available to see. Awesome job on video an quality parts
Great light set and price
Greg
May 15, 2021
A good start on rebuilding my car. They fix good.
1999 Camry headlights
Thomas
September 14, 2021
Excellent product.
Perfect replacement headlight and marker set
Daniel
May 2, 2022
Parts arrived on time, fit, form, and function perfectly!
Adan
January 31, 2023
Nice!!!!
Jason
February 4, 2023
Good fit good function
Robert
April 17, 2023
Good fit . Good quality. Bulbs were included. Thanks.
Tong
September 9, 2023
Good quality
Happy
Todd
January 7, 2024
The lights work well. I was pleasantly surprised they came with the bulbs! That was great. It took me a while to figure out how to adjust them, but overall I am pleased with the product. I know everything thing these days is made of plastic. Hopefully, they will hold up well. Time will tell.
Awesome headlights!
Hugo
April 18, 2024
Awesome headlights - quick and easy setup using 1A Auto video.
Customer Q&A
are these pre adjusted or do they have to be adjusted once installed?November 19, 2018
M H
10
You will have to adjust/aim them once installed. It can be done on a flat surface such as a wall or garage door. Or using a special tool that attaches to the headlight by using the three "bumps" on the front of the glass.
November 19, 2018
John G
10
They do have to be adjusted after installation.
November 19, 2018
Lamar B
10
I didn’t have to adjust
November 19, 2018
Jeff S
10
They are not pre-adjusted. What I did was to park my car fairly close to my garage door. I then put my existing lights on high beams and used masking tape to outline the upper and outside edges of the lights. I then replaced the lenses with 1A Auto's parts, installed brighter bulbs and, while on high beams adjusted the new assemblies to the tape outlines. Not perfect but got me close.
November 19, 2018
Vince D
10
No are adjusted you dont have to
November 19, 2018
Victor S
10
They have to be adjusted. One adjustment is for up and down. The other centers it from side to side. After installing, drive it in front of a garage or wall and turn them on. Youll be able to see which way you need to go. A YouTube video shows how to adjust them. Hope it helps my friend.
Monday - Friday 8:00am - 9:30pm ET Saturday - Sunday 8:00am - 4:30pm ET
Toyota is a registered trademark of Toyota Motor Corporation. 1A Auto is not affiliated with or sponsored by Toyota or Toyota Motor Corporation.See all trademarks.
Enter Vehicle Year Make Model
Specify your vehicle's year, make and model to guarantee fit.
Year
Make
Model
Options
Drivetrain
This part doesn’t fit a . Select from parts that fit.