Replaces
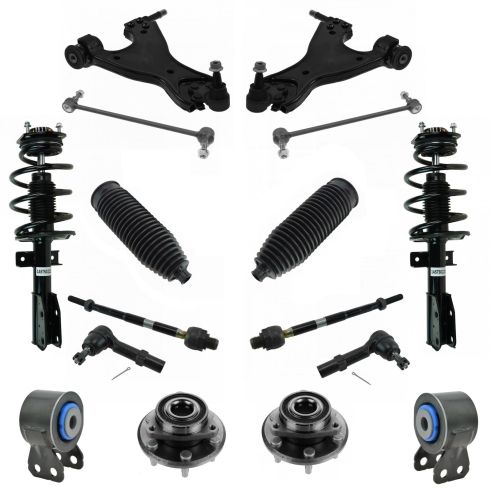
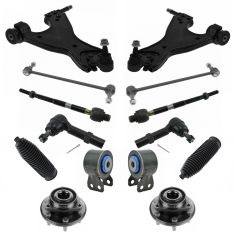
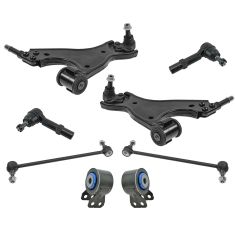
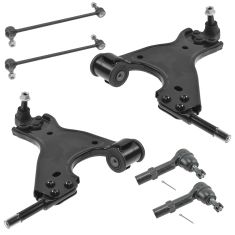
Replaces Chevrolet GMC Buick Front 14 Piece Steering & Suspension Kit TRQ PSA66562
$444.95
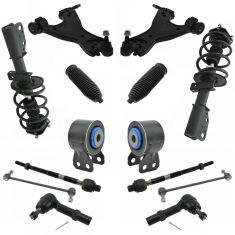
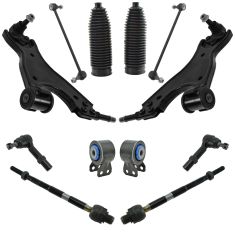
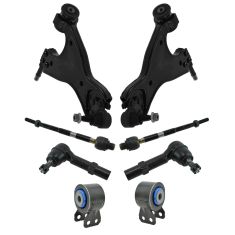
Replaces Chevrolet GMC Buick Front 12 Piece Steering & Suspension Kit TRQ PSA64841
$434.95
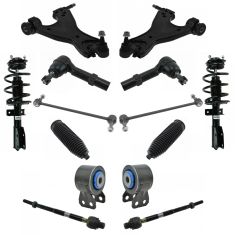
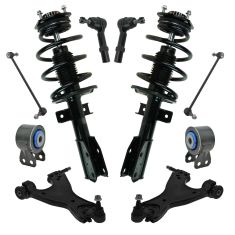
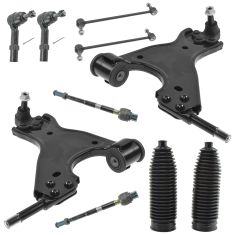
Replaces Chevrolet GMC Buick Saturn Front 14 Piece Steering & Suspension Kit TRQ PSA66554
$424.95

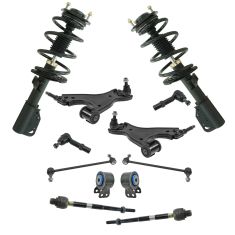
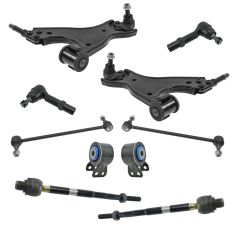
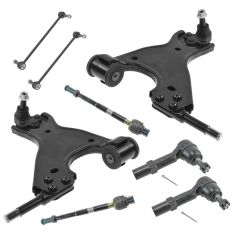
Replaces Chevrolet GMC Buick Front 10 Piece Steering & Suspension Kit TRQ PSA69963
$409.95
Replaces Chevrolet GMC Buick Saturn Front 10 Piece Steering & Suspension Kit TRQ PSA69982
$404.95
Replaces Chevrolet GMC Buick Saturn Front 14 Piece Steering, Suspension, & Drivetrain Kit TRQ PSA66553
$333.95
Replaces Chevrolet GMC Buick Saturn Front 12 Piece Steering & Suspension Kit TRQ PSA66000
$229.95
Replaces Chevrolet GMC Buick Saturn Front 10 Piece Steering & Suspension Kit TRQ PSA64839
$219.95
Replaces Chevrolet GMC Buick Saturn Front 8 Piece Steering & Suspension Kit TRQ PSA64840
$209.95
Replaces Chevrolet GMC Buick Saturn Front 8 Piece Steering & Suspension Kit TRQ PSA37168
$204.95
Replaces Chevrolet GMC Buick Saturn Front 10 Piece Steering & Suspension Kit TRQ PSA59876
$181.95
Replaces Chevrolet GMC Buick Saturn Front 8 Piece Steering & Suspension Kit TRQ PSA59164
$171.95
Replaces Chevrolet GMC Buick Saturn Front 6 Piece Steering & Suspension Kit TRQ PSA59163
$157.95
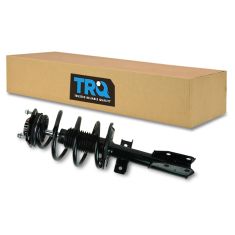
Replaces Chevrolet GMC Buick Saturn Front Strut & Spring Assembly TRQ SCA57990
$119.95
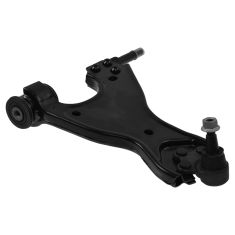
Replaces Chevrolet GMC Buick Saturn Front Passenger Side Lower Control Arm with Ball Joint TRQ PSA84289
$82.95
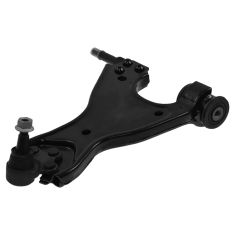
Replaces Chevrolet GMC Buick Saturn Front Driver Side Lower Control Arm with Ball Joint TRQ PSA84288
$82.95
Part Details
Product Features
TRQ drivetrain kits are manufactured using premium raw materials to restore original performance. Each TRQ drivetrain component is designed to be a direct, maintenance-free replacement to the stock unit. To extend the service life of your drivetrain, TRQ recommends replacing wheel hubs, bearings, and constant velocity (CV) drive axles at the same time to ensure even wear of components and improved ride comfort. All products are fit and road-tested in our Massachusetts R&D facility to ensure we deliver on our promise of Trusted Reliable Quality.
Replacing struts used to require specialized tools to compress, remove, and transfer the old spring and mount. Our Pre-assembled, complete strut & spring assemblies come with all new parts and make the job much quicker and easier for the do-it-yourself mechanic.
Strut & spring assembly contains:
Install Tip: When replacing steering components, have a professional alignment performed afterwards. This ensures proper tracking and even tire wear.
Our steering and suspension components are pre-greased and sealed for long life and do not require the extra maintenance typically required by greaseable versions.
Item Condition:
New
Attention California Customers:
 WARNING: This product can expose you to chemicals including Chromium (Hexavalent Compounds), which is known to the State of California to cause cancer, and birth defects or other reproductive harm. For more information, go to www.P65Warnings.ca.gov
Lifetime Warranty
This item is backed by our limited lifetime warranty. In the event that this item should fail due to manufacturing defects during intended use, we will replace the part free of charge. This warranty covers the cost of the part only.
FREE Shipping is standard on orders shipped to the lower 48 States (Contiguous United States). Standard shipping charges apply to Hawaii and Alaska.
Shipping is not available to a P.O. Box, APO/FPO/DPO addresses, US Territories, or Canada for this item.
Expedited is available on checkout to the United States, excluding Alaska, Hawaii.
Final shipping costs are available at checkout.


Created on:
Tools used
I'm gonna remove the wheel. Use a 22-millimeter socket, and pull the wheel off. I'm just gonna use a little rust penetrant. There's a little bit of rust on the stud. Take an 18-millimeter wrench, and you can loosen up the nut. And the stud is gonna spin, so you want to use an 8-millimeter socket. Put it on the stud.
You could try to loosen this up with an impact, but the stud is just gonna spin. And take the nut off. Now you can take the stud out, just like that. You can take this nut off the same way you took the other one off, if you use a 18-millimeter wrench and a 8-millimeter socket, or you can take some locking pliers, get on the back side, and use an 18-millimeter socket. Try to get it off that way. Sometimes it works, sometimes it doesn't.
Now take the new link, slide it back in position. Put the nut on. And for the stud on this new link, we have a, there's actually a spot where you can put a wrench, so you can use an 18-millimeter wrench, 18-millimeter socket. I'm gonna snug this up first. And I'm gonna torque this nut to 55 foot-pounds. And slide the sway bar up. Slide the link stud through this bracket on the strut. Get the nut started, then use an 18-millimeter wrench, 18-millimeter socket. Tighten this up. And torque this nut to 59 foot-pounds. And put the tire on.
Now I'm gonna torque these lug nuts to 140 foot-pounds, in a cross pattern or a star pattern, to tighten the wheel down evenly. Now go around again. Just double check.
Tools used
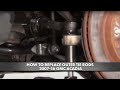
I'm going to remove the wheel. Use a 22-millimeter socket, and then pull the wheel off. Now, I'll take this axle nut off. Use a 34-millimeter socket. Now, I'm going to take this caliper off. I'm not replacing the brake, so I'm going to take the caliper and bracket off together. Take a 21-millimeter socket and a breaker bar and take these two bolts out. Take those out. I'm just going to take a screwdriver and just pry the piston in a little bit. That's good. We can slide this off, and just use a brake caliper hanger and just hang it on the strut assembly, on the coil spring. Now, I want to take this rotor off. There's a screw right here. Use a T30 socket. Take that off. That off, and take the rotor right off. Then take this wheel speed sensor off. Use a 10-millimeter socket. Take that bolt out. And you can use some pliers and try to wiggle this sensor out a little bit. Just be careful. Don't break it. There you go. Now, on the backside of the knuckle, there's three bolts. You're going to take a 13-millimeter socket and take those bolts out. All right. Take that out.
Now, from the backside of the hub, I'm just going to take a hammer and just tap it. You could try to use a sledge hammer, but sometimes it's easier just to use a hammer. There we go. And slide it off. You can take a wire brush. Just clean up some of this corrosion around the knuckle. That's why the hub was so difficult to remove. Clean that up. Make sure this spacer is on here on the axle. If it isn't there, just check your other hub. Maybe it got stuck to it. Now, I'm going to take a little bit of copper anti-seize and just do a thin coat, so if it ever has to be removed again, it won't be so difficult. Do a thin coat. Now, take this shield and the new hub, and just line it up like this, and take the bolts for the hub.
Go back in from the backside, get those started, and then torque those bolts to 89 foot-pounds. And take the wheel speed sensor, line that back up. Put the bolt in and snug it down. That's good. And take the rotor, put the rotor on, and take this screw. Put that screw back in and snug it up. All right. Now, grab the caliper. Take the hanger off. Now, we can slide it over the rotor and take the bolts. Get the bolts started. Then you can torque those two bolts to 129 foot-pounds, and put the axle nut on. And then I'm going to torque this to 173 foot-pounds and put the tire on. Now, I'm going to torque these lug nuts to 140 foot-pounds in a cross pattern or a star pattern to tighten the wheel down evenly. Now, I'll go around again. Just double-check.
Tools used
I'm gonna take these lug nuts off to take the wheel off. Use a 22-millimeter socket. ...wheel. Pull it off. Now I'm gonna take the caliper off with the bracket together, because I'm not replacing the brakes. I'm gonna use a 21-millimeter socket to take these bolts off the caliper bracket. There's two of them.
And we can slide the whole caliper and bracket off. You might have to twist this a little bit just to compress the piston. That's good. And now we'll just hang this. Use a brake caliper hanger, and just find a place to hang it from. Just hang it from the shock right here. Just make sure there's no tension on the hose. Looks good right there. Take this screw out. I'm gonna use a T30 socket. And take a hammer, if this rotor doesn't come off right away, if it's not loose, you can tap on these areas right there, and just be careful of the studs. And slide it out. There's a little bit of rust on here. I'm just gonna spray some rust penetrant. Let it soak for a minute.
Now, take a 34-millimeter socket. Take this nut off. The wheel speed sensor is located right here. There's a 10 millimeter bolt. Just take that bolt out. And pull that bolt out, and just grab the sensor. You might have to use some pliers and twist it. Pull it out, set it aside. And you need to remove these three bolts that are on the backside of the knuckle. Use an 18-millimeter socket. Take those bolts out.
I don't wanna ruin the threads on the end of the axle, so I'm just gonna use a punch and a hammer. Just give it a tap. Try to loosen up the axle from the hub. Now you can use a slide hammer. You can try hitting this with a hammer on the backside and trying to get it off, but sometimes a slide hammer is the only way to go. Just try to pull it off. Now, that didn't work for us. Today, this hub is stuck onto the knuckle a little bit too much. So what I'm gonna do is take these shoes off, so that I can get a hammer from the side, and hopefully that works a little bit better.
I'm gonna take these springs off. I'm just gonna use some needle nose pliers, some locking needle nose pliers, and just slide it out of the way. Take that off. Now I'm gonna take this adjuster out. You can use a screwdriver, pry the shoes out a little bit. We could adjust it down a little bit as well. And slide that out. And there's a bottom spring. You can use that same needle nose pliers, or locking pliers, and slide this spring out. There we go. And slide that spring out.
Now we'll take these springs out. You're gonna use a tool like this, and just push down, twist. You gotta hold the pin from the backside, and slide it out. Do the same on the other side. Take this shoe out. And slide it out. This pin is in my way, so I'll just slide this pin out and set it aside. Now I'm gonna use a hammer and just give it a couple of hits right here. There it goes. It's moving a little bit. Hit it from the other side. Be careful. You don't wanna mess up the threads. You could always put the nut on the end of it. There we go. And there it is.
I'm just gonna clean up this area right here. You can use a file or a wire brush. Get some of the corrosion. If you use a file, just don't go too deep. Don't file away the metal. Just clean it up. Gonna use some anti-seize so that if I ever have to take this hub off again, it's gonna be a little bit easier. Just gonna put a little on the splines of the axle. And just make sure you have the shield in the right position. Take a new hub, and line it up. And just push it on. And you're gonna get this all lined up, and then you can start one of the bolts from the backside. You can put a little thread locking compound on these bolts. There we go.
Now I'm gonna torque these bolts to 96 foot-pounds. And put the axle nut on. I'm just gonna take a pry bar. I lowered the vehicle down, and this is gonna prevent the hub from spinning while I torque this. I'm gonna torque this nut to 151 foot-pounds. I'm gonna put these shoes back. I gonna take this pin. Put that pin back first. Take the spring, and just slide this in position. You have to push it on, and then twist it. That's why it really helps to have this tool. There you go. You just twist it, so that... The cover is slotted. And then once you go over the pin, then you turn it, and that should lock in place. Do the same on the other one. There we go. That one's on.
Before I put any of the springs on, I'm just gonna put the adjuster back in position. You might have to make some minor adjustments with it if you moved it at all. Now I'll take the bottom spring. Just try to line this up. And get one side started. Take my locking pliers, and just get the other side in. There we go. Just make sure that's all the way in. There we go. Now it's in. And it's in on that side. That's good. And put the top spring in. Start it on one side. But, here we go underneath here.
The adjuster's in the way. There we go. Just like that. And again, use the locking needle nose pliers. Slide that in position. This one's a little easier than the lower one. Just make sure you lock it in. Looks good there, and there. Perfect. Now we can take the wheel speed sensor and reposition that into the knuckle, and take the bolt, get the bolt started, and snug that up. That's good. Now, if you had any rust on the backside of the rotor, you're gonna wanna clean that up, either with a wire brush or a scuff pad. And line this up. You might have to adjust your parking brake shoes. Those are pretty good. You just want them dragging just a little bit. That feels seem good. And take that screw. Screw that screw back in. Just snug it up. I'm gonna take the caliper off the hanger, and just make sure the hose isn't twisted. Slide the pads over the rotor. There we go. And take the bolts. You can put a little thread lock adhesive on them.
Get those back in position. Now we can put the caliper bolts back in. You can put some thread locking compound on the bolts. And torque these bolts to 129 foot-pounds. There we go. And throw the wheel up. The lug nuts on. Now I'm gonna torque these lug nuts to 140 foot-pounds, in a cross pattern, to tighten the wheel down evenly. And just go around again, double-check. And because we had the caliper off, it's always a good idea before you start the vehicle, just pump the brake pedal. That way, if there's any air gap, that takes away that air gap in between the brake pads and the rotor. That's good.
Tools used
I'm going to remove the wheel. Use a 22-millimeter socket, and then pull the wheel off. I'm just going to use a little rust penetrant. There's a little bit of rust on the stud. Take this wire off right here. There's a little retainer there. You might need a pry tool to get that off. And then there's one on the side here. Take an 18-millimeter wrench, and you can loosen up the nut, and the stud is going to spin, so you want to use an 8-millimeter socket. Put it on the stud. You can try to loosen this up with an impact, but the stud is just going to spin. And take the nut off, then you can take the stud out, just like that. Take these two nuts off. Use a 24-millimeter socket. Now, we're going to take these bolts out. Just use a hammer and give it a tap. There we go. Do the same for the other one. There we go. Right. So that I don't put too much tension on the brake hose itself, I'm going to take this bracket off. Just use a 10-millimeter socket. Take this bolt out. And you don't want to bend this hose too much, but that'll give you a little slack. Then we can slide the knuckle out. Now, I've got to take the wiper arms off. I'm going to use a straight blade screwdriver. Just get underneath the clip right here. Take that nut off. Use a 15-millimeter socket. Take that off, and just grab the arm. Just rock it back and forth, slide it off. And you're going to do the same with the other arm.
Take this fuse box cover off. Just use a straight blade screwdriver. Just push on the locks and slide them up out of the way, and then take this ground connection off. Just use a 15-millimeter wrench, loosen it up. And there's push clips along the front of the cowl. There should be a couple more on that side. Those are missing. Just use a straight blade screwdriver or a trim tool. Get underneath the clip and just slide those out. And then you're going to grab the cowl and just slide it over the stud right here, and then just try to raise up underneath. There's push pins holding it on. You can try to get underneath there with a trim tool, but normally, you can just pull it straight up, and then you can just pull it back there, and you can just raise it up out of the way. You don't necessarily have to take it out any further than that. I'm just going to put a little prop rod here. Just use a screwdriver or a trim tool. That works. And there's three nuts on the top. Just use a 15-millimeter socket. Take those off. When you get to the last one, you're going to have to support the strut underneath. All right. Now, I'm going to support from underneath. Get the last nut off and slide it down. Take these nuts off. Just keep one in your hand, then slide it in position. Then get the nuts started and then you can get the other ones started.
Now, we're just going to leave these on like this. We'll leave those loose. It's going to be easier to install it from down below, and then we'll tighten these up last. Then I'll take the knuckle and just line it up. You're going to have to pull it up a little bit and try to line the bolt up. There you go. Get the other one in. Just give it a little tap. You don't have to hammer it in all the way. And take the nuts. Get those started, and then we can tighten these down. Then we can torque these nuts to 144 foot-pounds. All right. Now, take the sway bar link and line it up. Get the nut on, and I'll use an 18-millimeter wrench to hold the stud, 18-millimeter socket. Tighten this up. Now, I'll torque this to 59 foot-pounds.
Now, the ABS wire, slide this in position right there and right there. Now, just take this brake hose bracket. Line this back up. Put this bolt on. If you felt uncomfortable taking this line off or this bracket off, you could always take the caliper off and hang the caliper on the strap assembly, and tighten this bolt down. Put the tire on. Now, I'm going to torque these lug nuts to 140 foot-pounds in a cross pattern or a star pattern to tighten the wheel down evenly. Now, I'll go around again. Just double-check. Now, we can tighten these down. Torque these nuts to 33 foot-pounds. All right. Now, I can take this cowl, and if any of these push pins came out down below, transfer them over and slide this back in position, and just line it up. And that looks good. You can take some of these push pins and then reinstall these. It should be four of them. And take that fuse box cover, put it back on. Now, I can reinstall the ground jumpstarting terminal, get that started, and just snug it up. That's good. Now, take the wiper arms and line them up. Try to put them back where they were. If you had to, you could mark them before you took them off, and put the nuts on. While holding the arm, tighten the nut down, snug it down, then put the cover on. Do the same for the other one.
Tools used
Tools used
I'm going to remove the wheel, use a 22-millimeter socket. I'm going to pull the wheel off. I'm going to take this nut off, use a 24-millimeter socket. You're going to take these two bolts out and there's two nuts on top. Use an 18-millimeter wrench to hold the nuts and then an 18-millimeter socket for the bottom. Take those out. To get these trim clips off, choose the trim clip tool. Now, you can use a pry bar, just pry on the control arm a little bit, try to slide this out. And take a hammer and just give it a tap and pry it off. Just like that. Take the new bushing. There is a ring right here, this steel ring that goes towards the back of the vehicle. This happens to have a blue collar right here. The white one, this goes towards the front of the vehicle, and just slide this in position. There you go.
Now, it's lined up. I'll just give it a tap on them. Make sure you use a rubber hammer or a dead blow. Get that to line up. That's good. I'll get that nut started and take these bolts. Get these bolts started and then put the nuts on top. Now, I'll snug these up first, and then use a torque wrench and torque these to 55-foot pounds. Then, I'm going to use a screw jack and raise up the lower control arm. You want this as close to ride height as possible. Ideally, you would want to put the tire on, lower the vehicle down to ride height, and then torque this, but it's not easy to get a torque wrench underneath the vehicle. So do the best you can. And then, torque this nut to 140-foot pounds. And then lower the control arm down. I'm gonna put the tire on. Now, I'm going to torque these lug nuts to 140-foot pounds in a cross pattern or a star pattern to tighten the wheel down evenly.
Now, go around again just to double-check.
Tools used
I'm gonna remove the wheel, use a 22 millimeter socket. I'm gonna pull the wheel off. I'm gonna take this ball joint nut off. You can use a 21 millimeter wrench to loosen it up. And take that off. I'm gonna use a pickle fork to disconnect the ball joint from the knuckle. There's different types of tools that you can use. There we go. It's separated. I'm gonna take these two bolts out. There is nuts on the top. Use an 18 millimeter wrench, those on the nuts. And then use an 18 millimeter socket to take the bolts out.
Now to remove this bolt and nut, we're gonna have to loosen up the link for the sway bar. The sway bar is in the way right now, if we were to pull that bolt out. You can try to slide that out, but most likely it's gonna be in your way, so we have to take the link off on this side and on the opposite side. I'm just gonna use a little rust penetrant. There's a little bit of rust on the stud. Take an 18 millimeter wrench and we can loosen up the nut. And this stud is gonna spin, so you wanna use an 8 millimeter socket, put it on the stud. You could try to loosen this up with an impact. But the stud is just gonna spin.
And take the nut off. Now you can take the stud out, just like that. With both of those links disconnected, then you can slide the whole sway bar up, and then you can access that bolt. And you can use a 21 millimeter socket and a 21 millimeter wrench on the nut. And loosen this up. You can slide the bolt up. Now just take a pry bar and just pry this out. There you go. Now take a 24 millimeter socket to take this nut off.
Then you can slide this bushing off. Now, you're gonna take that protector off and slide this bushing on. Now where this ring is, that goes towards the inside of the bushing. On this bushing it happens to have this blue area right here, the outside is white. Take the nut and just snug this up a little bit. We're gonna torque it later. And loosen it up a little. We want this to be able to move. I'm gonna take the new control arm and then just slide it in position. Take the ball joint, slide it into the knuckle. You can take the nut. Get that started. Now, get this bolt lined up, and put the nut on. Now, I'm gonna take these two bolts. Slide those through. Put the nut on top. Now, I'm gonna snug these down first. Use an 18 millimeter wrench up top, 18 millimeter socket down below.
Now, I'm gonna tighten these bolts to 55 foot pounds. Now, I'm gonna put a screw jack underneath the control arm and safely support the control arm. You wanna get the control arm as close to ride height as possible. It would be ideal if you could put the tire back on, put the vehicle down and then torque the nut here and torque the bolt here, but it's not that easy to get a torque wrench under there. So do the best you can to get this close. Then you can use a 13/16 wrench or a 21 millimeter wrench, 21 millimeter socket on the bolt and torque this to 111 foot pounds.
I'm gonna torque this nut to 144 foot pounds. Now we can use our wrench while this lower control arm is still supported, and tighten this nut up. And then once you get it tight, if you have the ability to put a torque wrench on there, you can torque that bolt, that nut to 30 foot pounds and then an additional 90 degrees. Now, I can lower this down, and slide that up, the sway bar up. Slide the link stud through this bracket on the strut, get the nut started and use an 18 millimeter wrench, 18 millimeter socket to tighten this up. And torque this nut to 59 foot pounds. I'm gonna put the tire on.
Now, I'm gonna torque these lug nuts to 140 foot pounds in a cross pattern or a star pattern to tighten the wheel down evenly.
Now I'll go around again just to double check. Now when you've done this job, you're gonna need to bring the vehicle to a shop to have it aligned, otherwise you're gonna have premature tire wear.
Tools used
Hi, I’m Mike from 1A Auto. We’ve been selling auto parts for over 30 years!
With the vehicle on the ground, you use a breaker bar and a 22mm socket to loosen the lug nuts. Raise and support your vehicle with a jack and jack stands. We're using our two post lift. Use the socket and finish removing the lug nuts. There it's seized to the hub. Take a couple of lug nuts—just thread them on lightly. Use a dead blow or rubber mallet, hit on the tire, and that will knock it free. Lug nuts will keep the wheel from falling off. Now it's loose. Finish taking the lug nuts off. Just going to support it so it doesn't fall.
I'll put some tape on the edge of the wiper blade, just mark where it is. When I remove the arms and reinstall, them I'll know where to align them. I'll just do this for both wiper arms and blades. You could use tape or even a permanent marker on the glass would be fine because it will clean off. Use a small flat bladed screwdriver, pop these caps up and off the end of the wiper arms. Do the same thing for both sides and remove that nut. Use a 15mm socket extension and ratchet extension to remove this. Get it free. Take it off.
We need to close the hood. Actually lift it up and rock it back and forth, pull it off, to lay back down, and open the hood. Get the wiper arm out. Just going to put the nut back on here so we don't lose it for now. Do the same for the other wiper arm. Cap up, to the side, and loosen the nut. Close the hood and rock it back and forth. Pull it right out.
This weatherstrip is just clipped into this outer plastic piece, just kind of pop it up and out. It can remain clipped to this to the cowl. There's push clips along the edge of the cowl. Take a flat blade screwdriver and pry them up. Pull them right out and put the center parts right back in. Just going to go along the entire edge and do the same.
The weatherstrip from right here too. Going to unscrew this ground lug for jump starting using a 15mm wrench, closed in, just unscrews. Take it right off and slide this trim up and around. It'll sit like that. Do the same for the other side. Lift up on the cowl, pull it out, and unclip the hood cable. Push it right up. That's loose there. Go to the other side and loosen it.
I'm going to move this fuse panel out of the way and push the locks in. Lift the cowl panel up and out. I'm going to put this cover back on so nothing in there gets damaged. Top of the sway bar link bolts through the strut. I'm going to use a wire brush and just clean the threads off so that when I remove the nut that's holding it, it'll spin easier. Just knock off some of the dust, knock off some of the dirt, rust and then I can spray some rust penetrant on here too. This nut is 18mm.
I'm going to use an 8mm socket on this breaker bar to counterhold the end of the sway bar link so it doesn't spin while I'm trying to remove it. Make sure it gets on here. It's a little rusty. Push it on, brace that against the knuckle, and remove this nut. Go this way with it. Spray some more rust penetrant on here, help get rid of some of the rusty chunky bits that are coming off. The nut is self-locking.
It's not perfectly round on the end—that's what locks it. It's going to be hard to turn, but it should turn and just keep doing this until you thread it all the way off. If you're replacing the strut, make sure you have a new sway bar link on hand because sometimes they break and they'll need to be replaced. As it gets towards the end and the locking part is coming off the threads, it should get looser and easier to turn. Let's see, take this off now. Just going to spin it off with my fingers.
It's stopping on that socket—I got stuck. Just give it a couple of turns. Socket’s loose and now just come off with my fingers. Need to push the ABS wire clip out of the strut, so we'll use some needle-nose pliers, and I'm just going to push down from the top and push it right out. Pops right out. This one down here—use some needle-nose pliers, just grab onto the connector, and work it out of the strut. Once you get some clearance there, the needle-nose underneath, just kind of pry it out.
Use a trim clip tool to get this lower one. Just want something to slide under there, and then you can pry it out, just like that. You put aside two bolts, holding the strut to the knuckle. I'm going to spray some rust penetrant on the threads and try to spray some between where the strut goes around the knuckle. Use a 21mm wrench to counterhold the head of the bolt. I'm going to use a long ratchet and a 24mm deep socket to remove the nut. You may need to use a breaker bar, but we'll try this. Repeat this for both bolts. This procedure will be the same on both sides.
If it's loose enough, you can just take it off by hand. We're going to leave that bolt in there for now. We'll loosen the bottom one. I have that loose, going to throw a little extension on here and give me some clearance against the brake caliper. The bolts have actual splines that sit inside here so they don't spin, but you do want to counterhold them as you're trying to get them off so you don't tear up those splines.
I'm going to reinstall the nuts just loosely on both of them. Use a ball-peen hammer and just tap them out. You see the splines here. Just keep tapping it. It's nice and loose—bolts come right out. I have to wiggle this around to get the bolt to come free. Lift up on it a little bit—there it is. Okay. That'll just sit like that.
Going to remove the three 15mm nuts that are holding in the strut to the strut tower. There's three studs that go through from the strut, and they have 15mm nuts on them. Use this 15mm deep socket extension and ratchet, and I will begin to loosen them. Kind of loosen them out evenly. Don't just take them all out because the strut will fall out, so you're going to loosen them all. And then when you get the last one loose, you'll reach underneath, support the strut and remove it, and then pull the whole strut out from inside the wheel well.
Get this one loose, right to the top of the threads and leave it. I'll remove the other two the same way. Go after the last one here. As you loosen this, the strut will actually start to lower down. Just going to push the strut off the knuckle. It's real loose in there. Push that up, and now it's only hanging by one of them. I'm going to reach up under here and support it, lift it up, and I can thread off the last nut by hand.
Now I need to guide this out of the wheel well. Just be careful that there isn't anything to support this brake line, so it is just kind of sitting here like that. It's okay, we're not over-stressing it but we're going to leave it like that.
This is our original strut for our vehicle. This one was leaking. It's got a little bit of fluid coming out of the top seal here, so dampness and dirt stuck to it. Here's our brand new complete strut assembly from 1AAuto.com. This is just a warning sticker telling you that the spring may settle after it's installed. You can just remove that. But it is a complete strut assembly—no need to swap over this spring to a new strut. Got a new top mount bearing, everything all ready to go. Makes this a real easy job. It will fit great and work great for you.
Before you install it you can remove this warning sticker too. This just tells you there's no need to loosen this nut that's in here that's holding the whole thing together. It's already all tightened and adjusted—you don't have to touch it. There's a bearing in here. I really can't spin it. I don't have enough leverage. But it will spin once it's bolted to the body of the car and connected to the knuckle. That way if it doesn't line up, attach these points and then turn it down here and line it up with the knuckle.
To reinstall the strut, going to take the nuts off. The new ones off the top of the studs that have them ready. Put them right up top here on the cowl panel. Bring the strut into the wheel well and slide it up into place. There are four openings, but three studs, so I'm going to put the stud back in the same place that one was originally, and you can see where the nut made a mark in the paint.
I'm just going to loosen it, and I'm going to lightly tighten the nut on there. Then I'll lift up the strut with the nuts on the O-ring and on the last one. I'm maneuvering the strut around with one hand underneath and installing the nuts with the other hand. They're going to stop when they get to the locking part of them. Take the 15mm socket and ratchet and tighten them up evenly. This will draw the strut up into the body. Just a couple turns so the other side you've got some turns and just repeat this till the strut's all the way up, and then I'll torque them afterwards.
So this will turn on the bearing now, so if you need to turn it and just line it up with the knuckle. It's at the knuckle. Lift it right into place because the sway bar link is not attached. Just lift right up. If you need to you can use a jack. Have one of the bolts handy. They do go in from this direction. Lift it up into place. Get the other one caught.
The little splines, they're lined up with the nuts on. I'm going to tighten the nuts and draw the bolts through. Just use a longer ratchet because they're getting a little harder to pull in because they're setting into the splines. I torqued these lower strut nuts to 144 foot-pounds. Put the wrench on here and counterhold the bolts. There you go. Torque the nuts for the upper strut mount to 33 foot-pounds.
Reinstall the sway bar link. We install the new one with our new strut. If you didn't damage your old one, you can reuse it. You can see how the opening is not perfectly round because it is a locking nut, sort of oblong or oval shape. As you tighten it down, it'll lock against the threads so you can thread it on as far as it'll go. Then we'll need to use a socket and ratchet to tighten it the rest of the way.
The back side of this is a six point. It looks like it would be a nut, it fits 18mm. Put it on there to counterhold it, and we use an 18mm socket to drive this in. If you're reinstalling the original one you took out that installation will be the reverse of the removal. Just tighten this down. This'll be the same for both of these, both the top and the bottom. Just get it tight and I'll come back and torque it. I want to do the same for the other side. Torque for the top one, it's 55 foot pounds. Hold it.
Reinstall the ABS wire where you clip it to the strut body. Push that in and then push this one in up here. Install lug nuts by hand. Going to use the socket to thread these down. We'll re-torque them with the vehicle on the ground. Torque the lug nuts in a cross pattern to 140 foot-pounds.
Reinstall the cowl panel cover. This is the inside of it. There are some hooks that will hook underneath the windshield, and it'll lay down over this lip here. Feed it around the hood strut and lift up on this plastic. Lift up on this clip here on the outside of the fender corner. It's going to slide underneath that. Slide it over and get the other side set. Lift up this plastic around the ground screw. Lift more like this and then it's going to go up, clip underneath. Put this rubber back, that down, and push the clip back in. Push this back in—the same for both sides.
Push the washer nozzle hose back in here. Put this down underneath. Clip it in place. Clip this down. Go ahead and reinstall all the push clips. Push these clips back in. Got this clip. I'll put it back in. Put the ground lug back on—it just threads back on. Give it a couple of turns to tighten it. That feels good there, I don't want to break it off.
Reinstall the wiper arms. The one with the shorter end here is the driver side. Move the nut that I put back on there so I wouldn't lose it. Just going to lay them in the same place with over the wipe transmission and wiggle it down and it'll go into the splines. That's where it was before. Get the nut started. The same for this one. Going to tighten these up. If I feel it getting tight I'll stop. I don't want to break off the wiper transmission. Same for this one. Replace these little caps. They just snap right back into place. They kind of pivot. Clip it right down. Do the same for both of them. Peel your tape off. Job is complete.
Thanks for watching. Visit us at 1AAuto.com for quality auto parts, fast and free shipping, and the best customer service in the industry.
Tools used
Now, you can take the lug nuts off. Use a 22-millimeter socket, so you can get the wheel off. Grab the wheel, slide it off. I'm gonna loosen up the jam nut. Just take a 15/16 wrench and loosen it up. That's good. I'm just gonna take a little rust penetrant, just spray down the tie rod stud. That'll make it a little easier to take that nut off. I'm just gonna take a pry bar, and just pry below the strut, and prying down on the tie rod to help the stud from spinning. And then use a 21-millimeter socket to take that nut off. Now, just take a hammer and hit on the bottom of the stud going up. We take this off, you're gonna want to count the threads, so, 1, 2, 3, 17, 17, and just write that number down somewhere. That's gonna make it easier for when you put it back together to get it close. So that when you go to have the alignment done, it's actually a little bit closer than if you didn't count the threads. We're gonna take some locking pliers, and just lock them onto the inner tie rod, and take a 24-millimeter socket, and take this nut off. Now, you can take this clamp off. The boot, use some hose clamp pliers or just some regular pliers, and just slide that off.
On the backside of this boot there is a clamp. If you just take a long pick and find where the clamp is put together or where it's pinched together, you can loosen up that pinched part, just spread it apart a little bit, and you might be able to slide the boot off. And most of the time you have to replace these clamps. But sometimes if you don't damage them too bad, you can reuse them. And there we go, that's slid off. If you're doing the right side, you can turn the steering wheel all the way to the left, that's gonna push this out really far. If you're doing the other side, just do the opposite, and try to get some locking pliers as close to the tie rod as possible. That's good. This is just gonna prevent the shaft from spinning and damaging any internal components in the steering rack itself. Then take a tie rod remover tool, get the correct adapter that fits. Slide this in position. All right, and loosen up the tie rod. Hold the locking pliers, there we go. Take your tool out. I'm just doing this by hand. There you go. Take the new tie rod in, inner tie rod in, and just apply a little bit of thread lock adhesive. And you can clean these threads out on the rack, use a little brake parts cleaner and a rag, just wipe that out, and thread this in. Now, you can put the adapter on and torque this to 74 foot-pounds. Now I'm gonna put the boot on. Now, my clamp is still reusable, so leave that on. If not, you could always use a wire tie if you have to. Now to tighten that clamp, I have these special pliers to tighten that. So just be creative on how to get this around here. You may have to take a heat shield off if you wanna get it from underneath, or you can try to get it in from up here. And if you don't have those pliers and can't access that, sometimes just carefully using some side cutters. You don't want to cut it, but you can pinch it just enough to lock it on there. Just make sure it doesn't twist, and that's good. Take that outer hose clamp or boot clamp, use some hose clamp pliers, and slide it back on. That's good. And put the jam nut back on. Now take the outer tie rod in, and count the threads when you go on, 1, 2, 17. And I'll just move the jam nut little closer, and take the stud, and line it up with the knuckle. Take the nut, the nut on. Now, take a pry bar, go under the strut, slide this down. And then I'm gonna torque this nut to 22 foot-pounds. And if you have an angled meter, you're gonna want to torque this an additional 120 degrees. If you don't, just do the best you can. That's 90, then I'll go another 30 degrees. I'm just estimating. That's about right, and we can tighten up the jam nut. If you have the ability to torque this, you can torque it to 55 foot-pounds. Put the wheel back on. I'm gonna tighten the lug nuts down, torque them to 140 foot-pounds in a cross pattern, so that it tightens the wheel down evenly. Go around again just to double check.
Tools used
Now, you can take the lug nuts off. Use the 22-millimeter socket, so you can get the wheel off. Grab the wheel, slide it off. I'm gonna loosen up the jam nut. Just take a 15/16 wrench and loosen it up. That's good. I'm just gonna take a little rust penetrant, just spray down the tie rod stud. That'll make it a little easier to take that nut off. I'm just gonna take a pry bar, and just pry below the strut, and prying down on the tie rod to help the stud from spinning. And then use a 21-millimeter socket, take that nut off. Now, just take a hammer and hit on the bottom of the stud, going up. When you take this off, you're gonna want to count the threads, so, 1, 2, 3...17, 17, and just write that number down somewhere.
That's gonna make it easier for when you put it back together to get it close so that when you go to have the alignment done, it's actually a little bit closer than if you didn't count the threads. Now, take the outer tie rod end and count the threads when you go on. 1, 2...17. And I'll just move the jam nut a little closer and take the stud and line it up with the nut hole.
Take the nut, put the nut on. Now I'll take a pry bar, go under the strut, slide this down. And then I'm gonna torque this nut to 22 foot-pounds. And if you have angle meter, you're gonna want to torque this an additional 120 degrees. If you don't, just do the best you can. That's 90, then I'll go another 30 degrees. I'm just estimating; that's about right. And we can tighten up the jam nut. If you have the ability to torque this, you can torque it to 55 foot-pounds. Now, put the wheel back on.
Now I'm gonna tighten the lug nuts down, torque them to 140 foot-pounds in a cross pattern so that it tightens the wheel down evenly. Go around again. Double check.
Tools used
Tools used
Brought to you by 1AAuto.com, your source for quality replacement parts and the best service on the Internet.
Hi, I'm Mike from 1A Auto. I hope this how-to video helps you out, and next time you need parts for your vehicle, think of 1AAuto.com. Thanks!
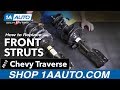
In this video, we're going to show you how to replace a front strut with an unloaded strut from 1AAuto.com on this 2010 Buick Enclave. We show you on the passenger side, but the driver's side is the same procedure. The items you'll need is that new unloaded strut from 1AAuto.com, flat blade screwdriver, 8mm, 15mm, 18mm, 21mm, 22mm, and 24mm socket and ratchet, 18mm wrench, torque wrench, spring compressors, a 13/16 spark plug socket, and jack and jack stands.
Start off by prying off your hub cap and then remove these 22mm lug nuts. You want to just loosen them while the vehicle is on the ground and then raise the vehicle up and remove them the rest of the way. Now the wheel will pull free.
Pry up the cap at the end of your wiper arm and then remove this 15mm nut. Then either using a wiper arm puller or just pushing it in and out and using penetrating oil and pulling it off, you want to remove the wiper arm, but a wiper puller helps. You just twist it. It pops it off the stud and you can pull it free. Then you just want to repeat the process on the other wiper arm.
Now you need to remove these four clips, and you can either use a pick and you just pry up the center of the clip and then pull the clip up and out, or you can use a flat blade screw driver, pry up the center, and then pry out the bottom. Remove this ground and pull it free. Then pry out this clip right here, and there's another one on the other side. You just need to pry them out of the body of the car, peel off this adhesive pad from the cowl panel, and do the same thing on the other side. Then pry up this clip right here on the driver's side of the cowl panel, and then pull up sharply on the cowl panel and it will release the clips. Then do the same thing for the other side. Then you want to just pull this up. Make sure all the clips have released and then pull the panel free.
Now you want to remove two of these three 15mm nuts, and then the last nut you just want to loosen most of the way. Use a flat blade screwdriver and pry out the clip that holds your brake line in place. Then an 18mm socket and ratchet you just want to get the bolt on the end of the stabilizer link to move. You have it moving. Then use an 18mm wrench and then an 8mm socket and ratchet. The 8mm socket and ratchet hold the stud into place while you remove them with the wrench.
You might have to a couple of times, spray some penetrating oil on, re-tighten the nut, and then loosen it back up. You can see, it just pulls right out. Now remove these two 24mm nuts, and you can loosen them up with a breaker bar, or you can use power tools. Once you get those nuts to a certain point, just put them back on just a little bit, and then pull this harness out of here. Just make sure you put the nuts on so they're flush with the bolts. Once you get them moving, then take the nuts off. All right, we've got the jack supporting the suspension just a little bit, so this comes up nice and loose. You want to make sure that your steering knuckle doesn't pull too far out. Remove the nut. Now we just wire tighten this right here so there's not too much stress on the axle or too much stress on the hose here.
Now with the strut out, you have to compress the spring. I've got my spring compressors. I'm just going to tighten those up. This is a large spark plug socket and it's got an insert in here to hold the spark plug up. I'm just going to take a 90-degree pick and pull that insert out so it's wide open. Put a 7/8 wrench on here and then there's a 9mm socket and I have an adapter on it to get it to 3/8. This socket is on here really tight, so I want to knock it off first.
Now you can just remove that nut and pull the top off with the spring and this pad. Take your new strut. Just loosen up the nut on the top and it will just pull out. Take this boot, transfer it over and transfer over this pad. Once you have that lined up, take the spring and lower it into place. Then the same way you got the previous nut off, you want to do that again to tighten this one back on. We'll fast-forward as Mike does that.
Before I tighten it up, I've just got my spring there, which it's in my cushion correctly. Make sure it's right there on the platform of the strut as well where it's supposed to be. Then, just to preliminarily aim, this should be facing towards the outside of the car, and then this stud here, the big one, should be towards the outboard part of the car. Once you line it up, tighten up the nut that holds the spring out of the strut, and then make sure it stays lined up as you loosen up your spring compressors.
Now feed the strut back up into place. You just want to push those studs through, replace one of the nuts preliminarily to just hold it there, and then line up the wheel knuckle into the strut. Then replace one of those bolts just to help hold it into place. Then replace the other bolt, and you can just hammer them in the rest of the way. Now just replace those two nuts. You can adjust your alignment, so you will need to have your vehicle aligned after you install these.
It looks like mine is pretty close to the middle. The top one is fixed, but the bottom one you can flex by pushing in or out on the knuckle. I'm actually just looking in behind. I can see a nice line where my old one was sitting. I'm just going to line it up there and then tighten it up preliminarily. I'm going to torque these to 120 foot-pounds.
Jack the strut up into place. I'm just going to put these 15mm nuts back on. I'll preliminarily tighten them, but we're going to torque them once the vehicle is back on the ground with the wheel on. Take the harness clip from your old strut and it just pulls out. Then you just push it into place in the new strut. Then re-clip the harness into that clip. Push this clip back into the lower part of the strut. Push the sway bar link back into place, and then just replace that nut and tighten it up.
Now you can replace the wheel, and then just replace the lug nuts and tighten them preliminarily in a crossing pattern. Then you want to lower the vehicle and tighten these the rest of the way and torque each of them to 100 foot-pounds, again in a crossing pattern.
Then you can just line up and hit your hub cap back into place. Now torque these three nuts up here to 45 foot-pounds. Pull out any clips that stayed behind in the vehicle and push them back into place in your cowl panel. Then feed the cowl panel back into place. Make sure it tucks back under, under the hood. Once you get everything lined up, just start pushing the clips back into place. Make sure that this adhesive cushion over here goes back up and over, and repeat the process on the other side.
Now replace those four clips. Just push in the lower part and then the center to lock them in. Replace the ground and tighten it back up. Make sure your weather strip is back in place, and then, for now, you can close the hood. Make sure these clips on either side of the cowl panel are back into the body of the vehicle. Push the wiper arm onto the stud. Make sure it's lined up where you want it and then replace that 15mm nut and tighten it up. Put the cover back on the end. Now just repeat the process with the other wiper arm.
We hope this video helps you out. Brought to you by www.1AAuto.com, your source for quality replacement parts and the best service on the Internet. Please feel free to call us toll-free, 888-844-3393. We're the company that's here for you on the Internet and in person.
Tools used
I'm gonna take a 22-millimeter socket and remove these lug nuts on the wheel. Now, I'm gonna remove the wheel. We're gonna take this nut off first. I'm using locking pliers behind just to hold the stud from spinning.
Now, what you could do is take an 18-millimeter wrench and then a socket on the end of this, and loosen it up that way. But this is a lot easier using the 18-millimeter socket. I might have to tighten this up a little more, and take that nut off. Now, that that's separated. I also separated the other side and that makes it easier, so, it's a good idea to do them both in pairs.
And then you can slide this down, and then you can gain access to this nut. We'll do the same on this one. Use some locking pliers, hold the stud from spinning, 18-millimeter socket, it comes right off.
Take the new link and slide it up. You're going to slide the stud towards the middle of the vehicle, and put the nut on using an 18-millimeter wrench then a 18-millimeter socket. Torque this down first. Torque this nut to 55 foot-pounds.
Slide that into the bottom of the strut. Take the nut, put that on. Take an 18-millimeter wrench on the inside, 18-millimeter socket, tighten this up. And torque this to 59 foot-pounds.
All right. Now I'm gonna put the tire back on, and the put the lug nuts on. Now, you're gonna tighten the lug nuts to 140 foot-pounds in a cross pattern to tighten the wheel down evenly. I'll just go round again to double-check.