Replaces
Part Details
Product Features
TRQ drivetrain kits are manufactured using premium raw materials to restore original performance. Each TRQ drivetrain component is designed to be a direct, maintenance-free replacement to the stock unit. To extend the service life of your drivetrain, TRQ recommends replacing wheel hubs, bearings, and constant velocity (CV) drive axles at the same time to ensure even wear of components and improved ride comfort. All products are fit and road-tested in our Massachusetts R&D facility to ensure we deliver on our promise of Trusted Reliable Quality.
Replacing struts used to require specialized tools to compress, remove, and transfer the old spring and mount. Our Pre-assembled, complete strut & spring assemblies come with all new parts and make the job much quicker and easier for the do-it-yourself mechanic.
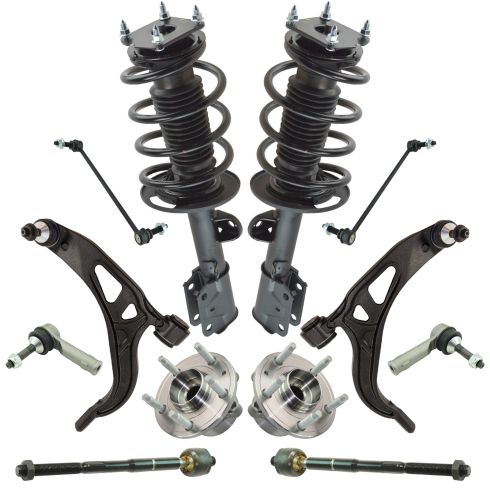
Strut & spring assembly contains:
Install Tip: When replacing steering components, have a professional alignment performed afterwards. This ensures proper tracking and even tire wear.
Our steering and suspension components are pre-greased and sealed for long life and do not require the extra maintenance typically required by greaseable versions.
Item Condition:
New
Attention California Customers:
 WARNING: This product can expose you to chemicals including Lead and Lead Compounds, which are known to the State of California to cause cancer, and birth defects or other reproductive harm. For more information, go to www.P65Warnings.ca.gov.
Lifetime Warranty
This item is backed by our limited lifetime warranty. In the event that this item should fail due to manufacturing defects during intended use, we will replace the part free of charge. This warranty covers the cost of the part only.
FREE Shipping is standard on orders shipped to the lower 48 States (Contiguous United States). Standard shipping charges apply to Hawaii and Alaska.
Shipping is not available to a P.O. Box, APO/FPO/DPO addresses, US Territories, or Canada for this item.
Expedited is available on checkout to the United States, excluding Alaska, Hawaii.
Final shipping costs are available at checkout.


Created on:
Tools used
Tools used
You want to keep in mind when you're doing this job after you're done you're going to want to go to a local garage and have the vehicle aligned so you don't have premature tire wear. Take the center cap off, just use a pry bar. You can use a rag underneath so you don't scratch anything. Use a 19-millimeter socket, take the lug nuts off, take the wheel off. Now, I want to take this lower ball joint nut off. You can use a 24-millimeter wrench or a 15/16th and loosen this up. And if the stud starts spinning, you can use an 11-millimeter wrench to hold the stud from spinning.
So my wrench isn't grabbing at the top anymore, so I can use some locking pliers on the threads below. I'm not re-using this ball joint, so if you're going to re-use the ball joint you don't want to do this. But just keep the stud from spinning, and if that's loose the plier is off, and slide it down. I'm going to use a pry bar, just slide the ball joint out of the knuckle. With that, just be careful and take this bolt out. Use a 21-millimeter socket. Slide that out. And I use an 18-millimeter wrench and there's two nuts on top, two bolts underneath here. Use a 15-millimeter socket and just grab the control arm.
And if you have to use a pry bar or just work it...walk it out. I'm going to use a bearing separator puller to try to get this off and just slide this on down below. Put these nuts on. Just going to set the tool up. I'm just going to use a little soapy water on this. It should be good. And I'm going to take this off. All right. Comes off pretty easy like that and just take a little more soapy water. Just spray the mount down and slide it over the new one, over the new arm.
Take a rubber mallet or dead blow hammer and hammer it on. And you want it about where it was when it came apart. Take the control arm, slide it in position. You can use a hammer to tap this in. Use, like, a rubber mallet or a dead blow. And line this up. All right. Line this front one out. If you need to use a screwdriver from the backside, get the bolt in. Line these bolt-holes up. Just use a Phillips head screwdriver. That's good. Slide the bolts through, put the nuts on top. We're going to torque these two bolts with the 18-millimeter wrench on top to 74-foot pounds.
And when you tighten this bolt down and torque it, you want this control arm as close to ride height as possible. It's recommended that you put everything back together, have the wheels on, and have the vehicle lowered down. But it's very hard to torque that bolt if the vehicle is down on the ground. If you had ramps, you could probably do it with ramps, but...but then, we're going to torque this bolt to 195-foot pounds.
Now, you can take a long pry bar and just slide this down. Trying to line the knuckle up. Just be careful, don't get your fingers near that. And just tighten this nut the same way you loosened it using the 11-millimeter wrench on top to prevent the stud from spinning and use the 15/16th wrench down below and tighten it up.
And if you have the ability to torque this nut, if you have a crow's foot, you want to torque that to 148-foot pounds. Put the wheel back on, the lug nuts on. Now, I'm going to torque the wheels to 110-foot pounds in a cross pattern, so I tighten the wheel down evenly. And just go around again, double-check. Center cap and line it up. Just tap it on.
Tools used
Before you start, you wanna be aware that after you've done this job, you're gonna wanna go to an alignment specialist so that you can have the vehicle aligned, so you don't wear out the tires prematurely.
Take off the center cap. You can use a pry bar. If you don't wanna scratch the wheel, you can use a rag or a cloth. Get underneath here. Pop it off. All right. Take the lug nuts off. Use a 19-millimeter socket, and remove the wheel. Now, I'm gonna loosen up this jam nut. Use a 21-millimeter wrench, and that's good. It's just gonna be loose. Now, I'm gonna take this nut off. Use a 21-millimeter socket. And sometimes it'll start spinning. The stud is spinning. So, I need to hold that. So, I can take a 21-millimeter wrench and a 10-millimeter socket, and it's just gonna hold the stud from spinning. Take that nut off, and slide the tie rod out of the knuckle. There you go. Now, I'm gonna unscrew the tie rod, and just count how many turns you have. So, 1, 2, 3, 4, 5, 20, 21. So write that number down so when you go to put it back together it goes together somewhat where it was when you took it apart. And I'll take the outer tie rod end and count my turns. One, 2, 3, 4, 5, 6, 7, 8, 9, 10, 11, 12, 13, 14, 15, 16, 17, 18, 19, 20, 21. Got 21 turns, and that's just gonna get the alignment closer. You still need to have an alignment done. All right. Now slide this into the knuckle. Take the nut, and tighten the nut up. I'm gonna use my wrench on the nut. Use the socket on the stud, and just tighten this up. And now, you can torque this to 111-foot-pounds. There you go. All right. Now, we're gonna tighten up this jam nut. If you have the ability to use a torque wrench, you can tighten that to 46-foot-pounds. Take the wheel, put it on. Put the lug nuts on. And now, I'm gonna torque these lug nuts to 110-foot-pounds. And I'm gonna do that in a star pattern to tighten the wheel down evenly. And just go around again, double-check. Take the center cap, and tap it back on. Good to go.
Tools used
Before you start, you wanna be aware that after you're done this job, you're gonna wanna go to an alignment specialist so that you can have the vehicle aligned so you don't wear out the tires prematurely. Take off the center cap, you can use a pry bar. If you don't want to scratch the wheel, you can use a rag or a cloth. Get underneath here, pop it off. All right. Take lug nuts off, use a 19-millimeter socket and remove the wheel. Now, I'm gonna loosen up this jam nut, use a 21-millimeter wrench. And that's good. It's just gonna be loose. Now, I'm gonna take this nut off, use a 21-millimeter socket. And sometimes it'll start spinning, the stud is spinning, so I need to hold that. So, I can take a 21-millimeter wrench and a 10-millimeter socket. And this is just gonna hold the stud from spinning. Take that nut off and slide the tie rod out of the knuckle. There you go.
Now, I'm gonna unscrew the tie rod and just count how many turns you have. So, 1, 2, 3, 4, 5, 20, 21. So, write that number down so when you go to put it back together, it goes together somewhat where it was when you took it apart. Now, we're gonna use some locking pliers and just put them on the inner tie rod so it doesn't spin. I'm gonna take a 21-millimeter socket and just take the jam nut off completely. Now. you're gonna take this clamp off. You can use some hose clamp pliers or even some regular pliers. Just slide it off. And then we're gonna take the inside clamp off and just use a straight... Now, you can use a straight pick and just try to get in there. Just wanna try to spread it out a little bit. And normally you can't reuse this but if you're careful enough, you might be able to reuse it. And it popped. And slide that off. And sometimes you can bend this back and reuse it, sometimes you just need a new one. And just grab the boot and just slide it off. You can use a pick right here and just try to help slide this off a little bit easier. I'll just pull it real hard to get that off.
All right. Now, we're gonna use a special tie rod tool. There is different tools that you can use and just attach it like this, it will tighten these nuts down. Now, I'll just put an extension on here and a breaker bar and loosen it up. There we go. All right. At this point, I can take the tool off or just take it off once I take the tie rod off. And there we go. You can take the new inner tie rod. If you choose, you can put some thread locking compound on the threads. Looks good. And just get it started. So, you could use the same tool to put it on or something a little bit different, something like this. This has an adapter. Slide this over here and just lock that on. Now, I can torque it. I'm gonna torque that to 66 foot-pounds. There we go. So, I'm gonna install the boot and put the clamp back on. And I'm just gonna take a little bit of grease. I'm just gonna put the grease right here. That's where this part of the boot is gonna sit right there. Put a little more to help slide it on. Get that lined up again and slide it over the body of the steering rack. And that's good right there.
All right. Now I'm gonna tighten that clamp up. I have some special pliers that are gonna tighten the clamp up. They squeeze it, push it down a little bit. And I just had to bend the shields back a little bit just so I can get these in here. Get that to line right up. Looks good. And just squeeze it. And I'll put this clamp on. That's good. And put the jam nut on. Now, I'll take the outer tie rod in and count my turns 1, 2, 3, 4, 5, 6, 7, 8, 9, 10, 11, 12, 13, 14, 15, 16, 17, 18, 19, 20, 21. Take 21 turns. And that's just gonna get the alignment closer. You still need to have an alignment done. All right. Now, slide this into the knuckle. Take the nut and tighten the nut up. I'm gonna use my wrench on the nut, use the socket on the stud and just tighten this up. And now you can torque this to 111 foot-pounds. Here we go. All right. Now, we're gonna tighten up this jam nut. If you have the ability to use a torque wrench, you can tighten that to 46 foot-pounds. Take the wheel, put it on, put the lug nuts on. And now I'm gonna torque these lug nuts to 110 foot-pounds. And I'm gonna do that in a star pattern to tighten the wheel down evenly. And just go around again, double-check. Center cap, tap it back on. Good to go.
Tools used
Pull the center cap off. Just use a pry bar. You can use a rag if you don't wanna scratch the wheel. I'm gonna use a 19-millimeter socket, take the lug nuts off. Remove the wheel. Now I'm gonna take the caliper off. I'm not gonna take it off separate from the bracket. I'm gonna take it all together off. So just take the bracket bolts out. Use a 15-millimeter socket. Take this one out and the one that's a little bit higher up. And just take a pry bar or screwdriver and just pry out the caliper. And you can just set it aside over here. If you want to, you can use a brake caliper hanger, but as long as it sits right there, it should be good. Now I'm gonna remove that screw right there. Use a T-40 socket.
Now I'm gonna take the rotor off. I'm just gonna use a hammer and just tap in these areas. Loosen it up. There we go. Slide it off. Now I'm gonna take this axle nut off. I'm gonna use a 32-millimeter socket. Take that off. All right. Now, I'm just gonna tap the axle a little bit. Use a punch. You don't really wanna hit on the end of it because you don't wanna mushroom the end of it and it'll prevent putting the axle nut on later. So just make sure it's loose. You don't have to hammer it all the way in, just make sure you see movement, which is good. Now I'm gonna pull the wheel speed sensor out. Let's use an 8-millimeter socket. Take this bolt out. Take that bolt out. Let's use some needle nose pliers. Try to twist it a little bit. Try not to break it. And slide it out and just set it aside. I'm gonna take these bolts out. I'm using an 18-millimeter socket. There's three that you can see right here and there's a fourth one on the other side of the axle.
All right. Take these bolts out. And then the other one right there. Just hit the backside with a hammer. There we go. Slide it out. All right. Just take some... You could take some Emery cloth or some sandpaper and just sand down any corrosion. Brake parts cleaner. Just clean it up. I'm just gonna put a little thin coat of anti-seize on here just to prevent corrosion. All right. Take the hub and line it up. The two holes at the top are closer together than the two at the bottom. And take the bolts. Get the bolts started from the backside. And now I'm gonna torque these bolts to 122-foot-pounds.
Now I take the axle nut, put the old axle nut on, and I'm gonna take a pry bar and just go in between the lugs. And you wanna make sure you don't...you don't wanna put the wheel on here and torque it with the weight of the vehicle on it. You wanna make sure there's no load on the actual wheel bearing. And torque this to 258-foot-pounds. Now, what that's gonna do is that's gonna seat the axle. What you need to do next is take this nut off and put a new nut on and torque that to 258. Take the wheel speed sensor and slide that back in position. Put the bolt in and snug that up. That's good.
If you want, you can put some anti-seize right there. Put the rotor back on, line it up with the hole, and put the screw back in and just snug that up and take the brake caliper and just slide it over the rotor. Put the bolts on and torque these bolts to 76-foot-pounds. And put the wheel on. Put the lug nuts on. Now I'm gonna torque these lug nuts to 110-foot-pounds in a star pattern to tighten the wheel down evenly. And just go around again, double-check. Take the center cap and line it up. Tap it on.
Tools used
Tools used
Take the center cap off. Just use a pry bar. You can use a rag underneath, so you don't scratch anything. Use a 19-millimeter socket to take the lug nuts off. Take the wheel off. Now, we're going to take the caliper and the bracket off together. Just take the caliper bracket bolts off using the 18-millimeter socket. Now, take the caliper off, and use a brake caliper hanger, and attach it to the coil spring. Just make sure the brake hose doesn't have any tension on it. Now, I'm going to take this screw out, and use a T40 socket, and slide the rotor off.
Now, we're going to take this nut off, and use a 32-millimeter socket. I just want to loosen up the axle from the hub assembly. Just take a punch and a hammer. Just give it a couple of taps. You don't have to push it in too far. Just get it a little bit loose. That looks good. Now, we want to take the ABS sensor out, our wheel speed sensor out. I'm going to use a 8-millimeter socket. Take this bolt out. Take that bolt out, and just take some needle nose pliers and just slide it out. Put it aside. There's four bolts on the backside of the knuckle. Take those bolts out. Use an 18-millimeter socket.
All right. So, these bolts are loose, but I'm not going to take them out completely because the CV joint is in the way. But as long as they're loose, then we can take a hammer to the hub. Just hit the backside of the hub. Just go back and forth, side to side, and just take the punch. Hummer the axle through. Just should slide right up. Take this spacer and make sure you put this on before...I just put a little grease on the back, so that it stays secure. Just on the axle. I'm just going to use a little bit of anti-seize. Just put a nice thin coat just to keep some of the corrosion away.
Take the hub and just slide it on. You can get the bolts started. I'm going to use a torque wrench and torque these bolts, all 4 of those, to 122 foot-pounds. And take the ABS sensor, a little speed sensor, slide that back into position, put the bolt in, and just snug that bolt up. It's good. All right, take the old nut, put the old nut on, and I'm just going to snug it up. So, there's a special procedure for torquing this nut. In the procedure, they tell you not to lower the vehicle down on the ground to torque the nut. What they mean by that is, don't have the wheel on, and have the weight of the vehicle on the spindle, or the wheel bearing while you're tightening it up.
So, what you want to do is take a pry bar, and just slide it between the lugs. And use the torque wrench. Torque the old nut to 258 foot-pounds. All right, now that seats the hub bearing to the axle. What you're supposed to do is remove that nut, put a brand new nut on, and re-torque it to 258 foot-pounds. All right, just take a thin coat of anti-seize. Put it on the hub. Take the rotor, put the rotor on, and make sure you line up that hole with the threads. Put the screw in, and just snug it up. That's good.
Yeah, now, take the caliper off the hanger, and put it back on the rotor. And get the bolts started, and now torque these to 122 foot-pounds. Put the wheel back on. Put the lug nuts on. Now, I'm going to torque the wheels to 110 foot-pounds in a cross pattern, so I tighten the wheel down evenly. And just go around again. Double-check. Center cap. Line it up. Just tap it on.


